How to - Make a surcote
No edit summary |
No edit summary |
||
| Line 5: | Line 5: | ||
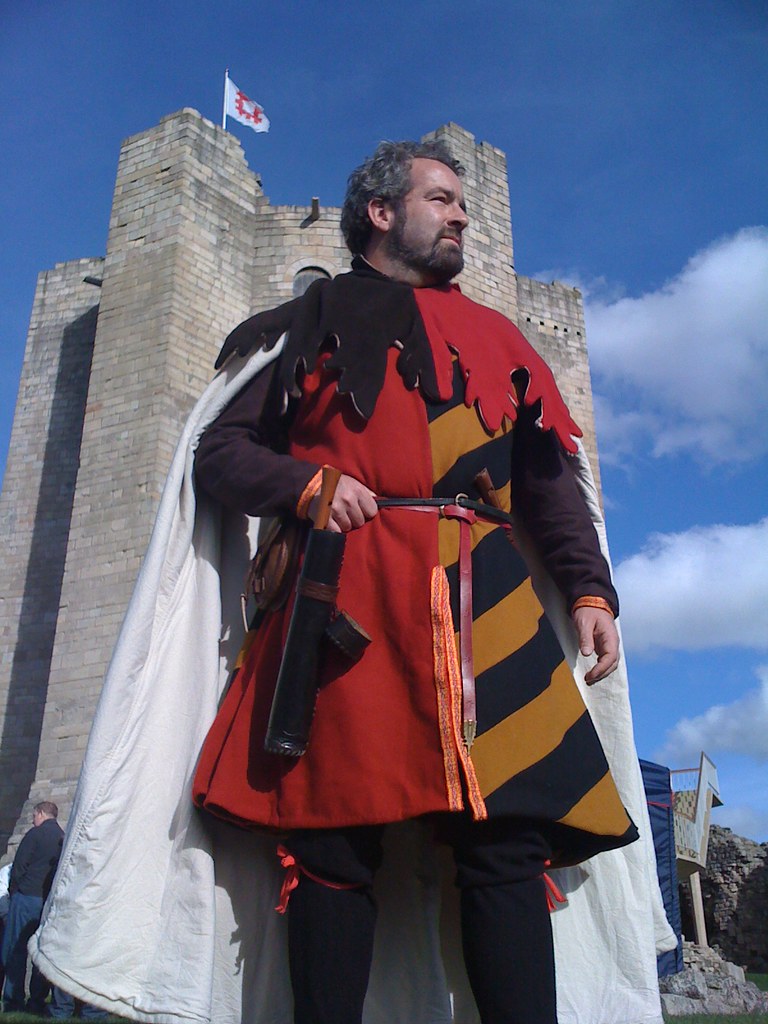
<br> Over your bliault, why not show your loyalty with a glorious surcote made in your House's or Lord's colours? This is a garment that is fundementally really simple - at its simplest, four pieces of cloth and four seams that looks fantastic and is (you guessed it!) historically correct. The fun comes in decorating it. This tutorial not only teaches you how to make the basic version, but talks you through a fabulous stripy alternative either as a walk-through to copy it in this or other colours, or as inspiration for making your own heraldic designs. | <br> Over your bliault, why not show your loyalty with a glorious surcote made in your House's or Lord's colours? This is a garment that is fundementally really simple - at its simplest, four pieces of cloth and four seams that looks fantastic and is (you guessed it!) historically correct. The fun comes in decorating it. This tutorial not only teaches you how to make the basic version, but talks you through a fabulous stripy alternative either as a walk-through to copy it in this or other colours, or as inspiration for making your own heraldic designs. | ||
<b>First, a note on heraldry. This is not a re-enactment. There are no rules</b> | |||
<br>Historically, there are a million rules governing what you can and can't do in heraldry. Ignore them. This is not a re-enactment. You can do pretty much whatever you like with colours and symbology, and if anyone tells you that it's wrong, feel free to ask them what the elves wore in the Hundred Years War. One thing that's worth saying, though, is that heraldry should be about recognisible designs and high contrast. For that reason, I'd recommend thinking about sticking with the colour rules that talk about metals and colours. Confused? Read on. | <br>Historically, there are a million rules governing what you can and can't do in heraldry. Ignore them. This is not a re-enactment. You can do pretty much whatever you like with colours and symbology, and if anyone tells you that it's wrong, feel free to ask them what the elves wore in the Hundred Years War. One thing that's worth saying, though, is that heraldry should be about recognisible designs and high contrast. For that reason, I'd recommend thinking about sticking with the colour rules that talk about metals and colours. Confused? Read on. | ||
| Line 16: | Line 15: | ||
== | ==Things you will need== | ||
<br>* 1.5m of wool fabric in two different colours for the 2 colour version | <br>* 1.5m of wool fabric in two different colours for the 2 colour version | ||
<br>*1m of a third colour of wool as well if you're making the magnificently stripy version. (I used red and yellow for the base and black for the stripes) | <br>*1m of a third colour of wool as well if you're making the magnificently stripy version. (I used red and yellow for the base and black for the stripes) | ||
| Line 41: | Line 40: | ||
Hem the front split and the bottom, the armholes and the neck. Bias tape is a nice way of doing the curved edges. (http://tutorials.abbott.me.uk/home/bias-tape ) | Hem the front split and the bottom, the armholes and the neck. Bias tape is a nice way of doing the curved edges. (http://tutorials.abbott.me.uk/home/bias-tape ) | ||
==Optional: decorating one or both sides== (photos to follow) | ==Optional: decorating one or both sides== (photos to follow)== | ||
While it looks great in one or two colours, you can make your heraldry really unique by putting stripes, chevrons or any design on one or both sides of your surcote. It's easiest to do before sewing it up. | While it looks great in one or two colours, you can make your heraldry really unique by putting stripes, chevrons or any design on one or both sides of your surcote. It's easiest to do before sewing it up. | ||
| Line 56: | Line 55: | ||
Then just sew your four pieces together, remembering that the stripy side is the right side, so you want your seams on the reverse. | Then just sew your four pieces together, remembering that the stripy side is the right side, so you want your seams on the reverse. | ||
<b>Hang on - can't I just sew strips of the two colours together to make a stripy bit of fabric, then cut my pieces from that?</b> | |||
Yes you can. In fact, I've done it that way before. Two caveats - if your stripes aren't going to be horizontal or vertical, the fact that you have to cut out the pieces at an angle to make the stripes slant means you waste a lot of fabric. Second, because you're cutting on the bias (i.e. not on the straight grain of the fabric) your stripy piece will drap and sag in a different way to the other side. Not too much of a problem, but it can look a bit uneven. But if you're going to have horizontal or vertical stripes, it's a time saver. | Yes you can. In fact, I've done it that way before. Two caveats - if your stripes aren't going to be horizontal or vertical, the fact that you have to cut out the pieces at an angle to make the stripes slant means you waste a lot of fabric. Second, because you're cutting on the bias (i.e. not on the straight grain of the fabric) your stripy piece will drap and sag in a different way to the other side. Not too much of a problem, but it can look a bit uneven. But if you're going to have horizontal or vertical stripes, it's a time saver. | ||
Revision as of 23:26, 16 July 2012
How to make a surcote
http://farm8.staticflickr.com/7120/7558504278_96385d6383_b.jpg
Over your bliault, why not show your loyalty with a glorious surcote made in your House's or Lord's colours? This is a garment that is fundementally really simple - at its simplest, four pieces of cloth and four seams that looks fantastic and is (you guessed it!) historically correct. The fun comes in decorating it. This tutorial not only teaches you how to make the basic version, but talks you through a fabulous stripy alternative either as a walk-through to copy it in this or other colours, or as inspiration for making your own heraldic designs.
First, a note on heraldry. This is not a re-enactment. There are no rules
Historically, there are a million rules governing what you can and can't do in heraldry. Ignore them. This is not a re-enactment. You can do pretty much whatever you like with colours and symbology, and if anyone tells you that it's wrong, feel free to ask them what the elves wore in the Hundred Years War. One thing that's worth saying, though, is that heraldry should be about recognisible designs and high contrast. For that reason, I'd recommend thinking about sticking with the colour rules that talk about metals and colours. Confused? Read on.
"Metals" in heraldry are actually white and yellow. This is because on your shield, you could leave them as metals, but on your surcote which was made to match, they'd have to be in the nearest two colours of cloth. Heraldic "colours" are all the other colours. The rules say that when you're putting a design in one colour onto another colour, "Metals" should go on "Colours" and vice versa, but a "Colour" shouldn't go on a "Colour", and a "Metal" shouldn't go on a "Metal". So a gold lion on a red shield is fine, but a white lion on a yellow shield is right out, and so is a green lion on a blue shield.
If you think about these examples, it kind of makes sense. If you're trying to see the Earl of Warwick at a hundred yards through a pitched battle at dusk, you want something that's high contrast and really stands out. White and yellow are the perfect contrast to all the other colours and make your unique heraldry much easier to see. For that reason, I've put black stripes (Colour) on a yellow field (Metal) - it works for wasps and it works for me,
Anyway, it's something to think about. Mull it over, and if you still want that purple dragon on a black shield, you go right ahead.
Things you will need
* 1.5m of wool fabric in two different colours for the 2 colour version
*1m of a third colour of wool as well if you're making the magnificently stripy version. (I used red and yellow for the base and black for the stripes)
* Black thread
* A tape measure
*A pen
* An iron. I really mean it this time.
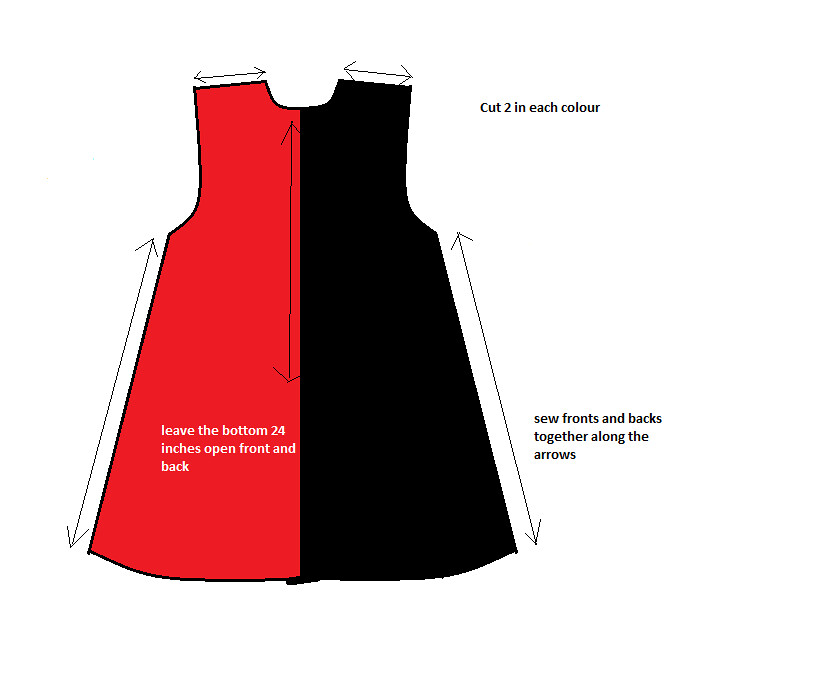
Here is your basic shape:
http://farm9.staticflickr.com/8142/7586393052_b829746f9a_b.jpg
You're going to cut two exactly like this, and two mirror images. The dimensions on this image will make up something that will fit over the T tunic in the previous tutorial. The neck hole can be approximated - you want something a little bit narrower and a little deeper than your under-tunic, so you get a flash of contrasting colour.
http://farm9.staticflickr.com/8019/7586392810_5ff26dd01e_b.jpg
Again, make sure that the dimensions will go round your chest and add to them if necessary. If you're going to wear it over armour, make sure you have your armour on when you measure, and add at least 5 inches in total to your armoured chest measurement. You may have to make the armholes deeper.
Here is a picture showing you how to sew it together -it's really as simple as sewing the shoulder seams (front to back on both sides), then the sides of the surcote. At the front, sew it from the neck down to about half way, then hem the edges below that - this gives you a split for mobility.
http://farm8.staticflickr.com/7130/7586434188_e4736d340c_b.jpg
Hem the front split and the bottom, the armholes and the neck. Bias tape is a nice way of doing the curved edges. (http://tutorials.abbott.me.uk/home/bias-tape )
Optional: decorating one or both sides== (photos to follow)
While it looks great in one or two colours, you can make your heraldry really unique by putting stripes, chevrons or any design on one or both sides of your surcote. It's easiest to do before sewing it up.
First, mark your stripes. The easiest way of doing it is to cut a piece of cardboard about 3 inches wide by 3 feet long and use it as a guide to mark your stripes at the angle you like on two cut pieces. You can choose to make the back and the front identical, or they can mirror each other so on the back the colours are reversed - there's no problem with either, so just do what you prefer. Mark your stripes on your fabric.
Now, cut your "stripe" fabric (black in this case) into 4 1/2 inch wide strips. You can usually just rip across the fabric, but check your fabric rips nicely and evenly before doing too many.
On your first marked line, pin your black stripe along it like so:
Sew this line, using your pins as a guide to get your stitches on the marked line. Then, turn the stripe over so that the stitched seam is covered by it, and press it. You can then turn the other side under and pin it in place ready to be hand or machine stitched down from the top. Then do this with every alternate line marked on your coloured piece until all your black stripes are sewn on. Well done. Now do it again. This is fiddly and time consuming, but don't mistake that for being impossible. Take your time, pin and press where necessary, and you'll get great results.
If your black stripes are at the neckline, you might want to topstitch round the edge before you trim off the excess black stripes, just so it behaves as one piece of fabric as you work with it.
Then just sew your four pieces together, remembering that the stripy side is the right side, so you want your seams on the reverse.
Hang on - can't I just sew strips of the two colours together to make a stripy bit of fabric, then cut my pieces from that?
Yes you can. In fact, I've done it that way before. Two caveats - if your stripes aren't going to be horizontal or vertical, the fact that you have to cut out the pieces at an angle to make the stripes slant means you waste a lot of fabric. Second, because you're cutting on the bias (i.e. not on the straight grain of the fabric) your stripy piece will drap and sag in a different way to the other side. Not too much of a problem, but it can look a bit uneven. But if you're going to have horizontal or vertical stripes, it's a time saver.
How about adding a heraldic logo or beast?=
This is great fun. Instructions for how to make a sensational but fairly easy appliqued design are here:
http://empire.crew.profounddecisions.co.uk/public-wiki/Civil_Service_Look_and_Feel