|
|
| (9 intermediate revisions by 2 users not shown) |
| Line 1: |
Line 1: |
| == Current configuration ==
| | [[Category:IT]] |
|
| |
|
| {| class="wikitable"
| | [[General-network|Network overview]] |
| |-
| |
| !Hostname !! Wireless IP !! Wireless MAC !!FastEthernet IP !! BVI IP !! Channel !! Mode !! Location !! Config Status !! Notes
| |
| |-
| |
| | bridge-a|| 10.1.0.2 || 0026.cb6a.8db0 || 10.1.0.1 || 10.2.0.1 || 2412|| non-root bridge wireless-clients|| Navar -> GOD || OK || -
| |
| |-
| |
| | bridge-b || 10.1.0.4 || 0023.5e0b.6b40 || 10.1.0.3 || 10.2.0.4|| 2437 || root access point || GOD -> Navar || OK || -
| |
| |-
| |
| | bridge-c || 10.1.0.16 || 0017.e009.5f50 || 10.1.0.15 || 10.2.0.16 || || repeater || Wintermark toilet block || OK || -
| |
| |-
| |
| | bridge-d || 10.1.0.18 || 0017.94a6.9b00 || 10.1.0.17 || 10.2.0.18 || || repeater || Workshop || OK || -
| |
| |-
| |
| | bridge-e || 10.1.0.40 || 001f.9ed3.3fe0 || 10.1.0.41 || 10.2.0.40 || || non-root bridge wireless-clients || || OK || -
| |
| |-
| |
| | bridge-f || 10.1.0.42 || 0013.19a4.9fe0 || 10.1.0.43 || 10.2.0.42 || || root access point || GOD -> Wintermark field || OK || -
| |
| |-
| |
| | Bravo || 10.1.0.14 || 0017.5a60.41e6 ||10.1.0.13 ||10.2.0.8 || || repeater || Hall of Worlds || OK || -
| |
| |-
| |
| | Charlie || 10.1.0.11 || 0014.693c.6160 ||10.1.0.12 || 10.2.0.11 || 2447 || root || GOD || OK || -
| |
| |-
| |
| | Delta || 10.1.0.10 || 0019.e88c.77ac ||10.1.0.9 || 10.2.0.6 || 2472 || repeater || Tavern || OK || -
| |
| |-
| |
| | Echo || 10.1.0.8 || 001a.6c17.93b7 || 10.1.0.7 || 10.2.0.7 || Not Set || repeater || || Flakey || -
| |
| |-
| |
| | Foxtrot || 10.1.0.6 || || 10.1.0.5 || 10.2.0.5 || || repeater|| Sentinel gate || OK || -
| |
| |-
| |
| | Golf || 10.1.0.31 || 0017.e0ba.66f0 || 10.1.0.30 || 10.2.0.30 || 2447 || root access-point || Monster || OK || -
| |
| |-
| |
| | Hotel || 10.1.0.20 || 0013.80aa.7a70 || 10.1.0.19 || 10.2.0.19 || || repeater || MC Tent || OK || -
| |
| |-
| |
| | India || 10.1.0.44 || 000d.29e1.60d9 || 10.1.0.45 || 10.2.0.44 || Not Set || repeater || || OK || Dot11Radio1 fucked, 0 not working as repeater
| |
| |-
| |
| | Juliet || 10.1.0.46 || 000d.2917.ebee || 10.1.0.47 || 10.2.0.46 || Not Set || root || Server room || OK || Dot11Radio 0 not fitted
| |
| |-
| |
| | Kilo || 10.1.0.48 || 000d.bc7e.716a || 10.1.0.49 || 10.2.0.48 || Not Set || root || Navar woods || OK || -
| |
| |-
| |
| | Lima || 10.1.0.52 || || 10.1.0.53 || 10.2.0.52 || Not Set || repeater/root || GOD || OK || Dot11Radio1 configured as PD_PLAYER open wifi
| |
| |-
| |
| | Mike || 10.1.0.54 || 000f.908b.79e0/000d.2917.ea23 || 10.1.0.55 || 10.2.0.54 || Not Set || root || Plot Cave || OK || -
| |
| |-
| |
| | November|| 10.1.0.50 || 000d.2917.eba6 || 10.1.0.51 || 10.2.0.50 || Not Set || root|| || OK || Dot11Radio 0 not fitted
| |
| |-
| |
| | switch-core|| 10.1.0.201 || || || || || || Server room || OK ||
| |
| |-
| |
| |} | |
|
| |
|
| == Capabilities ==
| | [[Wireless-New|Wireless config page]] |
| | |
| These radios operate in the 2.4Ghz or 5 Ghz microwave band, and support 802.11b/g wifi connections.
| |
| We have many units:
| |
| 12(?) x omnidirectional, indoor units, two with standard antennas, two with (high-gain?) antennas.
| |
| (Aironet 1200 series)
| |
| | |
| Some of the 1200 series have two radios installed: The 2.4-GHz radio is radio 0, and the 5-GHz radio is radio 1.
| |
| | |
| 6x weather-proofed point-to-point units with highly-directional integrated antennas,
| |
| with separate (indoor) breakout boxes.
| |
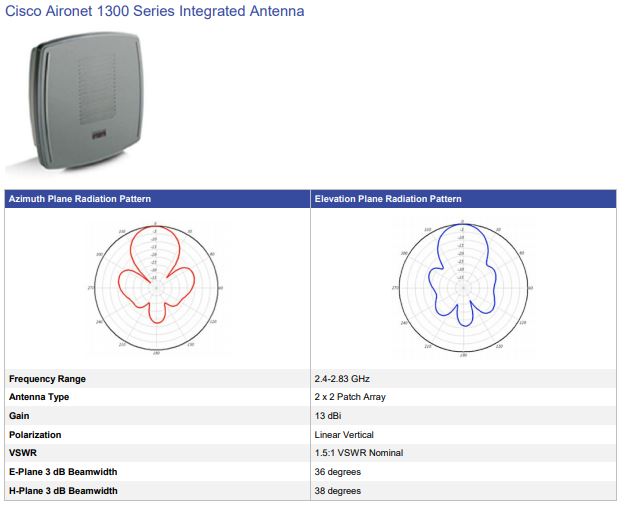
| (Aironet 1300 series)
| |
| | |
| == Controlling the units ==
| |
| | |
| These wireless base-stations are sophisticated computers in their own right. They run the
| |
| Cisco IOS operating system: specifically, version 12.3.
| |
| By default, they can be controlled via a serial console, using the special
| |
| cyan RJ45-DB9 serial cable provided or the cyan USB-serial cables.
| |
| | |
| They can also be controlled via telnet and have a web interface which is occasionally useful. By default, configured to use DHCP to
| |
| acquire their own IP address, but we have over-ridden this for obvious reasons (it's hard to telnet to a device when you don't know what its address is ...).
| |
|
| |
|
| === Connecting === | | === Connecting === |
| Line 107: |
Line 42: |
| <TAB> will auto-complete unambiguous partial commands. | | <TAB> will auto-complete unambiguous partial commands. |
|
| |
|
| The access point default username is 'Cisco' and the default password is 'Cisco'.
| | |
| == Configuring units == | | == Configuring units == |
|
| |
|
| Line 113: |
Line 48: |
|
| |
|
| * Enter admin mode | | * Enter admin mode |
| ** Gain privileged access: enable | | ** Gain privileged access: |
| ** The default username and password is 'Cisco'.
| | <nowiki>enable</nowiki> |
| * Enter config mode. | | * Enter config mode. |
| ** Enter (configuration) context: | | ** Enter (configuration) context: |
| configure terminal | | <nowiki>configure terminal</nowiki> |
|
| |
|
| * Set the local hostname:
| |
| ** Set hostname:
| |
| hostname NEWHOSTNAME
| |
| Note: this will change the default prompt from 'ap' to the hostname you specify.
| |
|
| |
| * Configure AP to use a broadcast NTP time signal:
| |
| ** Enable the SNTP client, to listen to the first broadcast signal:
| |
| sntp broadcast client
| |
|
| |
| * Configure AP to maintain a network map:
| |
| ** Enable network-map generation
| |
| dot11 network-map 1
| |
|
| |
| * Configure AP with the PDCREW wireless network details:
| |
| ** Mint the new SSID: <pre>dot11 ssid PDCREW</pre>
| |
| ** Set the shared secret to connect to this AP:
| |
| authentication open
| |
| authentication key-management wpa
| |
| wpa-psk ascii PASSWORD
| |
| NOTE: The WPA-PSK has to be 8 characters or longer. You know what the password is ...
| |
|
| |
| * Allow to be used as an infrastructure ssid
| |
| infrastructure-ssid optional
| |
| * Set the SSID to be announced:
| |
| guest-mode
| |
| * Exit from SSID sub-mode:
| |
| exit
| |
|
| |
| * Turn the radio on, and add the PDCREW SSID to it:
| |
| ** Select a radio interface to add the SSID to: <pre>interface dot11radio 0</pre>
| |
| ** Tell the wireless system to use correct regional settings:<pre>world-mode dot11d country-code GB outdoor</pre>
| |
| ** Set the radio to optimise for range (as opposed to speed)<pre>speed range</pre>
| |
| ** Set the power settings to locally-permitted maximums.<pre>power local cck maximum</pre><pre>power local ofdm maximum</pre>
| |
|
| |
| ** Turn the radio on:<pre>no shutdown</pre>
| |
| ** Configure encryption mode ciphers:<pre>encryption mode ciphers tkip</pre>
| |
| ** enable extensions:<pre>dot11 extension aironet</pre>
| |
| ** Add the SSID to this radio:<pre>ssid PDCREW</pre>
| |
| ** Set the ip address<pre>ip address 10.1.0.x 255.0.0.0</pre>
| |
| ** Assign the interface to the correct bridge group:<pre>bridge-group 1</pre>
| |
| ** Ensure STP is enabled: <pre>no bridge-group 1 spanning-disabled</pre>
| |
| ** Exit SSID configuration mode: <pre>exit</pre>
| |
|
| |
| * Configure the ethernet port
| |
| ** select interface<pre>interface FastEthernet 0</pre>
| |
| ** Set the ip address<pre>ip address 10.1.0.x 255.0.0.0</pre>
| |
| ** Assign the interface to the correct bridge group:<pre>bridge-group 1</pre>
| |
| ** Ensure STP is enabled: <pre>no bridge-group 1 spanning-disabled</pre>
| |
| ** Exit ethernet configuration mode: <pre>exit</pre>
| |
|
| |
| * Configure the BVI port
| |
| ** select interface<pre>interface BVI 1</pre>
| |
| ** Set the ip address<pre>ip address 10.2.0.x 255.0.0.0</pre>
| |
| ** Exit BVI configuration mode: exit
| |
|
| |
| * Configure the bridge group
| |
| ** Enable STP for the bridge group <pre>bridge 1 protocol ieee</pre>
| |
| * Exit config mode:<pre> exit </pre>
| |
|
| |
| * Save your work
| |
| copy running-config startup-config
| |
|
| |
| ==== Root bridge ====
| |
|
| |
| * Configure radio to operation in a root bridge role:
| |
| ** Enable configuration mode: <pre>configure terminal</pre>
| |
| ** Select 2.4Ghz radio:<pre>interface dot11radio 0</pre>
| |
| ** Set channel :<pre>channel x</pre>
| |
| ** Set role:<pre>station-role root bridge wireless-clients</pre>
| |
|
| |
| ==== Non-root bridge ====
| |
|
| |
| * Configure radio to operation in a non-root bridge role:
| |
| ** Select 2.4Ghz radio: <pre>interface dot11radio 0</pre>
| |
| ** Set role: <pre>station-role non-root bridge wireless-clients</pre>
| |
|
| |
| ==== Field/Tent AP ====
| |
|
| |
| * Make sure the radio is in root mode:
| |
| ** Select 2.4Ghz radio: <pre>interface dot11radio 0</pre>
| |
| ** Set channel :<pre>channel x</pre>
| |
| ** Set role: <pre>station-role non-root bridge wireless-clients</pre>
| |
|
| |
| ==== Repeater ====
| |
|
| |
| * Configure radio to operation in a repeater role:
| |
| ** Select 2.4Ghz radio: <pre>interface dot11radio 0</pre>
| |
| ** Set role: <pre>station-role repeater</pre>
| |
|
| |
| === Understanding current state ===
| |
|
| |
| * Review the current SSID list:
| |
| <nowiki>show running-config ssid PDCREW</nowiki>
| |
|
| |
| You should see something like:
| |
| <nowiki>dot11 ssid PDCREW
| |
| authentication open
| |
| authentication key-management wpa
| |
| guest-mode
| |
| wpa-psk ascii 7 140716081E013D7D76
| |
| end</nowiki>
| |
|
| |
| * Show the network-map:
| |
| <nowiki>show dot11 network-map</nowiki> | | <nowiki>show dot11 network-map</nowiki> |
|
| |
|
| Line 228: |
Line 60: |
| | | |
| * Commit live configuration as the new default: | | * Commit live configuration as the new default: |
| <nowiki>copy running-config startup-config</nowiki> | | <nowiki>write memory</nowiki> |
|
| |
|
| * Show neighbouring Cisco equipment: | | * Show neighbouring Cisco equipment: |
| Line 239: |
Line 71: |
| <nowiki>bridge-e#sh dot11 associations | | <nowiki>bridge-e#sh dot11 associations |
|
| |
|
| 802.11 Client Stations on Dot11Radio0:
| |
|
| |
| SSID [PDCREW] :
| |
|
| |
| MAC Address IP address Device Name Parent State
| |
| 000d.29e1.60d9 10.2.0.44 Repeater india 000d.bc7e.716a Assoc
| |
| 000d.bc7e.716a 10.2.0.48 ap1200-Rptr kilo self Assoc</nowiki>
| |
|
| |
| * Spanning tree info:
| |
| ** General info: <pre>show spanning-tree</pre>
| |
| ** Displays status and configuration of this bridge: <pre>show spanning-tree bridge</pre>
| |
| ** Displays a detailed summary of information on the spanning-tree root (not the root bridge, the master of the spanning tree): <pre>show spanning-tree root</pre>
| |
|
| |
| *Enabling logging (if connected via telnet or ssh) <pre> terminal monitor</pre>
| |
|
| |
| === Removing an ssid ===
| |
| Some images set up the _tsunami_ ssid on factory reset, to remove it:
| |
| (from configure mode)
| |
|
| |
| <nowiki>
| |
| ap(config)#interface dot11Radio 0
| |
| ap(config-if)#no ssid tsunami
| |
| ap(config-if)#exit
| |
| // if fitted repeat for dot11Radio 1
| |
| ap(config)#no dot11 ssid tsunami
| |
| ap(config)#exit</nowiki>
| |
|
| |
| == Factory reset ==
| |
| === 1200 series ===
| |
| To return the wireless base-stations to factory settings, power off the device, then --
| |
| while holding the 'mode' button down -- power the wireless device back up.
| |
| Continue to hold the 'mode' button down for a few seconds, then release.
| |
| === 1300 series ===
| |
| If you can login (enable):
| |
| *Enter <code>erase nvram</code> to erase all NVRAM files including the startup configuration.
| |
| *Enter <code>Y</code> when the following CLI message appears: <code>Erasing the nvram filesystem will remove all configuration files! Continue? [confirm]</code>.
| |
| *Enter <code>reload</code> when the following CLI message appears: <code>Erase of nvram: complete</code>. This command reloads the operating system.
| |
| *Enter <code>Y</code> when the following CLI message appears: <code>Proceed with reload? [confirm]</code>.
| |
| If you can't login, try '''really hard''' to log in. Otherwise:
| |
| *Open the CLI with a Telnet session or a connection to the bridge console port.
| |
| *Reboot the bridge by removing and reapplying power.
| |
| *Allow the bridge to boot until the command prompt appears and the bridge begins to inflate the image.
| |
| *Press ESC when you see lines that are similar to these on the CLI:
| |
| <nowiki>Loading "flash:/c1310-k9kw-7mx.v122_15_ja.200040314-k9w7-mx.v122_15_ja.20040314"
| |
| ...#############################################################################</nowiki>
| |
| Note: In order to access the boot loader, you must press ESC twice. But this action depends on the terminal-emulation software that you use.
| |
| Messages that are similar to these appear:
| |
| <nowiki>Error loading "flash:/c1310-k9kw-7mx.v122_15_ja.200040314-k9w7-mx.v122_15_
| |
| ja.20040314"
| |
| Interrupt within 5 seconds to abort boot process.
| |
| Boot process terminated.
| |
| The system is unable to boot automatically. The BOOT environment variable needs to
| |
| be set to a bootable image.
| |
| C1310 Boot Loader (C1310-BOOT-M), Version 12.2 [BLD-v122_15-ja_throttle.20040314 100]
| |
| bridge:</nowiki>
| |
| *At the bridge: prompt, issue the '''dir flash:''' command in order to view a directory of the Flash file system. The directory is similar to this directory:
| |
| <nowiki>bridge: dir flash:
| |
|
| |
| Directory of flash:/
| |
|
| |
| 2 -rwx 0 <date> env_vars
| |
| 5 drwx 384 <date> C1310-k9w7-mx.v133_15_JA.20040314
| |
| 3 -rwx 1128 <date> config.txt
| |
| 4 -rwx 5 <date> private-config
| |
|
| |
| 3693568 bytes available (4047872 bytes used)
| |
| bridge:</nowiki>
| |
| *Delete or rename the files config.txt and env_vars, and reboot the bridge. '''Note''': Do not forget the / character before the filenames.
| |
| <nowiki>bridge: delete flash:/config.txt
| |
| Are you sure you want to delete flash:/config.txt (y/n)?y
| |
| File "flash:/config.txt" deleted
| |
|
| |
| bridge: delete flash:/env_vars
| |
| Are you sure you want to delete "flash:/env_vars" (y/n)?y
| |
| File "flash:/env_vars" deleted</nowiki>
| |
| *Issue the boot command in order to reboot the bridge at the bridge: prompt, or simply power cycle the bridge.
| |
|
| |
|
| == Updating the operating system --- Here be dragons == | | == Updating the operating system --- Here be dragons == |
| Some problems Clive has been having with some of the devices have been resolved by updating to a more recent version of IOS. (Yes, Cisco also call their OS IOS. In fairness, they were there first: [https://blogs.cisco.com/news/cisco_and_apple_agreement_on_ios_trademark “Cisco has agreed to license the iOS trademark to Apple for use as the name of Apple’s operating system for iPhone, iPod touch and iPad. The license is for use of the trademark only and not for any technology.”]) | | Some problems Clive has been having with some of the devices have been resolved by updating to a more recent version of IOS. (Yes, Cisco also call their OS IOS. In fairness, they were there first: [https://blogs.cisco.com/news/cisco_and_apple_agreement_on_ios_trademark “Cisco has agreed to license the iOS trademark to Apple for use as the name of Apple’s operating system for iPhone, iPod touch and iPad. The license is for use of the trademark only and not for any technology.”]) |
|
| |
|
| There should be a running tftp server on favog. It should even have one or more IOS images on it. It'll look like this (once Clive has copied it from his local server to favog, anyway): | | There should be a running tftp server on favog. It should even have one or more IOS images on it. It'll look like this: |
| <nowiki> ls -ls /srv/tftpboot/ | | <nowiki> ls -ls /srv/tftpboot/ |
| total 5284 | | total 5284 |
| Line 371: |
Line 127: |
| Once this is done, restart it. And hope that you've not bricked it ... | | Once this is done, restart it. And hope that you've not bricked it ... |
|
| |
|
| == Old bits from early experiments, probably not really worth keeping, but just might be ==
| |
|
| |
| Aquarion's notes, essentially
| |
| ============
| |
|
| |
| Wireless Topology
| |
| -----------------
| |
|
| |
| Suggested wireless topology; at this point, only units 1-3 have been configured.
| |
|
| |
| (- ~ ~ ~ ~ ~ -) v ~ ~ v ~ ~ v ~ ~ v
| |
| [ GOD network ] ---- | | --- | | | |
| |
| RB NRB AP R R R
| |
|
| |
| #1 #2 #3 #4 #5 #6
| |
|
| |
| RB : Root-bridge
| |
| NRB: Non-root bridge
| |
| AP : Root access point
| |
| R : Wireless repeater.
| |
| Wireless MAC Ethernet MAC channel
| |
| #1 -- bridge-a 10.1.0.2 & 1 00:26:cb:6a:8d:b0 88:43:e1:d1:fd:ac 1 \ 1300-series
| |
| #2 -- bridge-b 10.1.0.4 & 3 00:23:5e:0b:6b:40 00:23:5e:99:56:02 1 /
| |
| #3 -- field-ap 10.1.0.6 & 5 00:14:69:2d:4a:10 00:14:6a:40:44:49 6 \
| |
| #4 -- repeater-1 10.1.0.8 & 7 11 1200-series
| |
| #5 -- repeater-2 10.1.0.10 & 9 00:19:E8:8C:77:AC 13
| |
| #6 -- repeater-3 10.1.0.12 & 11 00:14:69:ee:3b:ab 8 /
| |
| #7 -- repeater-4 10.1.0.13 00:13:80:ec:bb:b8 5
| |
|
| |
|
| |
| These are only suggested IPs; at present, they are all using DHCP to establish their own IP, and these
| |
| have not yet been configured in the AD.
| |
|
| |
| Ideally, the repeaters will also be configured such that wired devices attached to them
| |
| will be bridged onto the crew network. (Note: this has security implications - we don't want
| |
| players to be able to do this!)
| |
|
| |
| [ In practice, this appears not to be supported? ]
| |
|
| |
| Performance
| |
| -----------
| |
|
| |
| At Odyssey E1, 2013, bridge-[a/b] and the field-ap were all configured and test-deployed:
| |
|
| |
| * bridge-a was propped up on a desk in GOD
| |
| * bridge-b was propped up on a box outside the bar, in the ~middle of the IC field.
| |
|
| |
| This was an initial test, but it proved to be unexpectedly successful. Despite there being in the way:
| |
|
| |
| * Most of GOD
| |
| * A wet hedgerow
| |
| * Several (dampened) tents
| |
| * A number of people milling about
| |
| * A fair distance
| |
|
| |
| ... a solid signal could be established between the two bridge units, despite not having
| |
| done any careful alignment. (Perhaps we were just lucky?)
| |
|
| |
| 'show dot11 statistics client-traffic' shows:
| |
|
| |
| 27-0026.cb6a.8db0 pak in 12503 bytes in 2295602 pak out 4385 bytes out 693295
| |
| dup 0 decrpyt err 0 mic mismatch 0 mic miss 0
| |
| tx retries 1159 data retries 1158 rts retries 1
| |
| signal strength 74 signal quality 18
| |
| ==Radiation Patterns== | | ==Radiation Patterns== |
| [[File:Cisco1300.JPG]] | | [[File:Cisco1300.JPG]] |
Network overview
Wireless config page
Connecting
Windows XP
Use Hyperterminal to connect to a unit:
-> Use 9600 baud, no parity, 1 stop bit, and disable hardware flow control.
OSX/Linux
There should be a USB/Serial cable in the box. Clive will also have one in his bag of stuff. But if you lose his, it will be painful ...
Find the port number in terminal:
$ ls -ltr /dev/*usb*
crw-rw-rw-  1 root  wheel   21,   2  7 Apr 16:33 /dev/tty.usbserial-AH0668GD
crw-rw-rw-  1 root  wheel   21,   3  7 Apr 16:33 /dev/cu.usbserial-AH0668GD
or
matt@merple:~> ls -ltr /dev/ | grep -i usb
crw-rw---- 1 root dialout 188, 0 Sep 13 21:11 /dev/ttyUSB0
matt@merple:~>
You can use screen to connect:
$ screen /dev/tty.usbserial-AH0668GD 9600
Personally, Clive hates using screen, so has downloaded and installed a small cli serial emulator. If you're on a machine it's been installed on, having found the port you want, you connect using:
serial /dev/tty.usbserial-AH0668GD 9600
Log in
If you've got things right, then if you have the cable plugged in when you turn a wireless
base-unit on, you should see boot-time messages start to scroll past for about a minute after
power-on.
Press <ENTER> when prompted to bring up control menu.
Prompt is displayed as: ap> -- or, if the device has been given a different hostname, either manually
or via DHCP, then it will appear as: hostname>
Pressing '?' will display a list of commands.
<TAB> will auto-complete unambiguous partial commands.
Configuring units
Common
enable
- Enter config mode.
- Enter (configuration) context:
configure terminal
show dot11 network-map
show running-config
- Commit live configuration as the new default:
write memory
- Show neighbouring Cisco equipment:
show cdp neighbors [detail]
sh ip interface brief
- Get an idea of your network map:
bridge-e#sh dot11 associations


== Updating the operating system --- Here be dragons ==
Some problems Clive has been having with some of the devices have been resolved by updating to a more recent version of IOS. (Yes, Cisco also call their OS IOS. In fairness, they were there first: [https://blogs.cisco.com/news/cisco_and_apple_agreement_on_ios_trademark “Cisco has agreed to license the iOS trademark to Apple for use as the name of Apple’s operating system for iPhone, iPod touch and iPad.  The license is for use of the trademark only and not for any technology.”])

There should be a running tftp server on favog. It should even have one or more IOS images on it. It'll look like this:
 <nowiki> ls -ls /srv/tftpboot/
total 5284
5284 -rw-r--r-- 1 tftp tftp 5408256 Apr 23 19:41 c1310-k9w7-mx.124-10b.JA1.tar
Steps
Simple in principle:
- Find an equivalent piece of hardware that is working and has the feature
- Get both devices on the network, use an ethernet cable for preference
- Upload its current image, if it's not already there
- Download it on the 'broken' one
Upload an image
First, find out what image you have. It'll be the directory with long name starting with your hardware's part number, eg:
bridge-e#sh flash

Directory of flash:/

    2  -rwx        2072   Mar 1 2002 00:11:18 +00:00  private-multiple-fs
    3  -rwx        1261   Mar 1 2002 00:11:18 +00:00  config.txt
    4  drwx         256   Jan 1 1970 00:06:24 +00:00  c1310-k9w7-mx.124-10b.JA1
  153  -rwx          70   Mar 1 2002 00:02:33 +00:00  env_vars
  155  -rwx           5   Mar 1 2002 00:11:18 +00:00  private-config

7741440 bytes total (2395648 bytes free)
In this case, c1310-k9w7-mx.124-10b.JA1
Copying it is actually fairly easy:
bridge-e#archive upload-sw tftp://10.0.0.18/[the directory name from above].tar
Download an image =
Again, relatively easy:
bridge-f#archive download-sw tftp://10.0.0.18/[the directory name from above].tar
You'll see something along the lines of:
examining image...
Loading c1310-k9w7-mx.124-10b.JA1.tar from 192.168.0.20 (via BVI1): !
extracting info (275 bytes)!!!!!!!!!!!!!!!!!
[OK - 5408256 bytes]

Image info:
    Version Suffix: k9w7-.124-10b.JA1
    Image Name: c1310-k9w7-mx.124-10b.JA1
    Version Directory: c1310-k9w7-mx.124-10b.JA1
    Ios Image Size: 4669952
    Total Image Size: 5407232
    Image Feature: UNKNOWN
    Image Family: C1310
    Wireless Switch Management Version: 1.0
followed by a lot of progress information which may well include wiping the original image out.
Once this is done, restart it. And hope that you've not bricked it ...
Radiation Patterns