How to - Make a fur hat
Overview
A fur-edged hat is a simple piece of kit to make that particularly suits Wintermark, Varushka and a League citizen hailing from the northern city of Temeschwar. It's easy to imagine a well-travelled Marcher or Navarr wearing something like this as well, or perhaps even a Dawnish yeofolk pulling one down over their ears on a freezing winter morning.
This guide was written by an Empire player, and has been rated "suitable for a beginner" by our local costume expert.

Making the hat
I first had the idea thanks to this article here, and conveniently I had some short haired dark brown fake fur that I bought a couple months ago along with a whole load of purple wool I bought before Christmas. This should be the kind of thing that anyone can make with very little materials and is of course perfect for Norse inspired settings or other similar cultures (Varushka or Wintermark in Empire LRP for example) but to be honest I think you could use it at most events and get away with it to keep your head warm.

Materials
The only materials that are needed are the wool, the fake fur and some thread. I used a strip of fur about 6 by 24 inches (obviously will be less if you have a smaller head) and a length of wool about 30 by 7 inches (but if you were smarter than I was, you could manage it with less fabric thanks to better template placement). I don’t know the exact price but I would be surprised that it come to more than £6-10 or so, and most of that due to the expense of the fake fur I picked up.

Washing the wool
The first thing was to wash the wool, which I was reliably informed was a good idea. I think there are more professional ways of doing it, but my wool was washed in the machine, with a bit of liquid detergent on a 30 degree wash for 50 minutes. I didn’t see much difference so i washed it again at a higher temperature and when it came out there was a noticeable difference in the amount the cut edges frayed (much less after washing) which makes the project a lot easier thanks to there being no need to hem it.

Constructing the hat
Onto the construction. There are various ways of doing this but they all consist of cutting triangles of fabric and stitching them together. Depending on the style you can just cut out two large and long triangles that are sewn together leaving a long section that is folded over and held by a pin like this one or it can be made with smaller panels like the one I linked at the start.
I decided to follow the more generic skullcap version and go with 4 panels, the length of which I got by measuring the circumference of my head and then dividing it by 4, and I got the height by following these instructions. I also added an inch or two to the circumference to take into account the fur I would be adding later and my hair. I recommend erring on the side of caution here, far better to make it too big and cut out later then find yourself with too small a hat.

I used some old card to work up the template as I didn’t have any spare fabric around, and then cut 3 more triangles out of card that I pinned together to check the fit. I had my fair share of dud attempts, so don’t get disheartened if you have to re-do the template a few times to get it right.
For my finished template, I ended up with four triangles in the hat and gave each one a 90 degree angle on the top - I did this just by using the corner of my ruler.

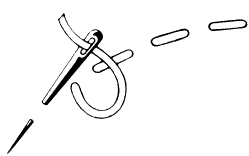
After the fit was right I cut the four triangles out of the wool, and pinned them together to check the fit on my head before stitching them together with a blanket stitch. It is an incredibly easy stitch to do, just lie the two pieces of fabric flat and follow this tutorial here, with this tutorial laying out how to finish your sewing. It also gives a nice border if you were to use a thicker thread in a different colour (which I should have done) and want to leave the seams showing.
Now you have your basic hat shape, try it on again for the fit. I actually had to unpick one side of sewing and cut it down a bit to ensure a better fit. Don’t worry if it appears to be about half an inch or an inch too big, this space is needed for the fur trim you are adding in a moment.

Trimming
Take your strip of fur and cut it to match the circumference of the hat then pin a small part of it wrong side up to the inside of your hat like so. Take care to use a stanley knife or something similar to cut along the backside of the fur and not scissors as it causes a huge mess and ruins the fur.

Use a running stitch or a backstitch to sew the fabric and the fur together then remove the pins. This anchors the fur to the hat and helps to tighten the fit to your head ensuring that the hat should fit snug.
Now you decide how wide of a fur trim you want on your hat and trim it down accordingly. I think my fur was about 5 inches wide including the part tucked on the inside but it is up to personal taste.
Pin the fur in place alongside the outside of the hat and then just like before sew the fur onto the fabric. For this bit I flipped the hat inside out which was a lot easier as it meant the fur wasn’t obscuring the needle and thread.
There you have it! One fur lined hat.
Working out the point
This is a fairly simple guide for working out the angles involved in making the hat come to a point.
