Archive:Basic Tooling Skills
mNo edit summary |
No edit summary |
||
| Line 1: | Line 1: | ||
{{stub}} | {{stub}} | ||
=Casing= | |||
For leather to be tooled it ideally needs to first be cased, which is an old, technical and clever term for getting it wet. The reason it has an old, technical and clever term for it is because, unfortunately it’s not just any old kind of ‘wet’.<br/> | |||
There are a number of ways of casing leather, some of which are a bit misleading. Firstly the idea of submerging leather and then sealing it in an airtight container or bag for 24 hours isn’t really casing it; it’s just soaking it! This is because, being airtight, none of the excess moisture can escape so you may as well have just dunked your leather in a bath and proceeded to tool it immediately; the results of which would be just as poor as the leather would be far too wet and soft to hold any definition.<br/> | |||
In broad terms, to case leather it should be briefly submerged in luke warm water; the amount of time is entirely dependent on the density and thickness of the leather. Very fine leather will require just a quick pass through the water, whereas thicker, heavier weight leather should be left submerged until the rate of bubbles rising from the flesh side begins to slow. It should then be allowed to breathe, either simply placed to one side or traditionally it was placed in a wooden box (the wood would possibly absorb some of the moisture evaporated from the leather and the boxes certainly weren’t airtight).<br/> | |||
This period of ‘resting’ allows the moisture to fully penetrate even into the deep fibres of the leather and be retained there whilst the surface is allowed to dry. The leather is ready to be worked when the surface has returned to its original colour but still feels cool when placed against your skin due the moisture retained within.<br/> | |||
The dryer surface will provide resistance to the swivel knife and tools, thereby remaining crisp; the softened fibres within will be easily compressed by your tool’s impact and remain that way.<br/> | |||
That said, the main traditional reason for properly casing leather for tooling is that when the surface is sufficiently dry, and the inner fibres sufficiently moist, the surface will colour through and ‘bruise’ when the inner fibres are compacted; giving a variety of shades to the natural colour of the leather. | |||
==To case or not to case?== | |||
If you are intending on keeping the natural colour of the VegTan leather and are simply going to use a clear seal over it once your work is complete, then properly casing it first will give you the finest results. | |||
Likewise if you are intending on moulding the leather then the methods used for casing (with some temperature variants) can be used.<br/> | |||
However, if you are simply going to be dyeing over the leather with any colour, the subtlety of the natural shading is going to be lost, so is it really worth all the preparation? In all honesty, no; I don’t believe it is. | |||
==Dampening== | |||
A simple plant mister or spray bottle, preferably one with an adjustable nozzle or as fine a spray as possible and plain tap water. This is all I’ve ever really used for tooling leather that is later going to be dyed. Simply spray the entire piece of leather you are going to be working on until it is evenly covered and there is minimal water sitting on the surface; though how much you actually spray will depend on how thick the leather is.<br/> | |||
For fine grade, thin leather just a quick pass over will be sufficient, for thicker ‘armour’ leather (3mm and above) it is best to aim for some remaining on the surface and allow it to soak in completely prior to starting work.<br/> | |||
What you don’t want is for the surface to be too wet. Yes this will mean it is much easier to mark and cut, but this is because it is softer and therefore won’t provide as crisp or clean lines and even the most minor of tooling mistakes will be shown; even nail marks where you have rested you hand can be picked up!<br/> | |||
You are aiming for the surface to be ‘just damp’ when you start work. In that way you will have time to progress before you need to spray it again; which on a large piece you will need to do repeatedly.<br/> | |||
As you work you should begin to feel it becoming slightly tougher, your strikes need to be a little harder and the feedback has a little more bounce to it. This is when the inner fibres are drying out and it’s time to give it the once over with the spray again. This is an acquired skill that will develop over time. Though sadly this will not be made any easier by the simple fact you are working with a natural material, meaning that each hide will have its own variations. Sorry about that.<br/> | |||
You can dampen your leather with a wet sponge or cloth instead. However it can be more difficult to provide an even coverage in addition to often making the leather too wet and needing to wait longer for it to dry prior to starting work. | |||
===Additional Tip=== | |||
Make sure you dampen the entire piece you are working on and not just the section you are intending to tool. This will avoid the creation of water or tide marks that, more often than not, will continue to show through as variations once the leather has been dyed. | |||
=Marking= | |||
There are a number of different ways to mark your design onto your leather. Each has their advantages and disadvantages and the success of some are unfortunately dependant on how artistic you are. | |||
==Freehand== | |||
Either in pencil prior to dampening your leather or with a plain stylus after you have dampened it. With a light pressure draw your design directly onto the surface of the leather. The advantage in this is you can either incorporate natural flaws in the piece of leather or tailor your design to make the best use of the space available as well as creating a truly unique piece. The disadvantage can also be that it will be unique, therefore replicating a complex freehand designs can prove to be difficult. It also, unfortunately for some, requires you be able to draw in some capacity. | |||
==Craftaid== | |||
A ‘Craftaid’ is a preformed template, usually made of plastic (though you can make your own in wood or leather) where the basic lines of a design appear as raised ridges. Once you have dampened your leather you simply place the Craftaid face down where you would like the design to be and evenly apply pressure to the reverse side of it, either with your hand, spoon end of a stylus or even gently tapping it with your mallet. Lift the Craftaid off and it will have formed a series of depressions all ready for cutting. It's that simple. | |||
The advantage in these is that it enables anyone, regardless of any drawing ability, the opportunity to tool a design, some of which can be quite complex. The disadvantage is that they are each fixed and so cannot be made slightly smaller or larger to fit your piece of work. | |||
==Tracing== | |||
This is the general method of transferring designs to leather. The best medium to used is tracing film as it is unaffected by the dampness of the leather that would otherwise cause tracing paper to easily tear, it also stands up well to repeated used over the same design. However, with care, good quality tracing paper can be used, though generally not for more than a couple of reproductions. | |||
First trace your design from the original onto the film. I would recommend using a pencil as some pens only work sporadically on film and additionally can cause transference of the ink to the leather. Pencil can also sometimes transfer to the leather, but is easily removed simply through the actions of tooling and so will not impair the final dyed finish. | |||
Once you have dampened your leather rest the film with the design in the desired position then simply re-trace over it. This can be done again with a pencil or a stylus or even with a ball point pen (it doesn’t matter if it won’t mark the film). Be careful not to move the film whilst you are tracing the design. When done simply lift it away and you will be left with a slightly darker, bruised mark where the pressure has transferred the design to the leather. | |||
This is the most versatile method of transferring designs and one that allows you to use a vast array of original source images to turn into tooled work. Clever moving and re-tracing of a repeating design can enable you to go from straight sections to round curves. Likewise, with some artistry, you can specifically tailor a design to make the best use of available space within your overall template. Best of all, you can do it again, and again, and again. | |||
===Additional Tip=== | |||
If you wish to create a matched, mirror image of your design, you do not need to redraw it, simply turn the film over and re-trace from the other side. This is where you can run the risk of ink transfer to the surface of the leather. | |||
=Swivel Knife= | |||
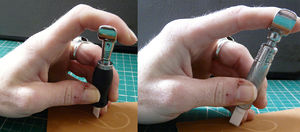
To use a swivel knife you rest your index finger across the rest and lightly grip the barrel between your middle and ring fingers and your thumb as illustrated. | |||
{{CaptionedImage|file=Fig75.jpeg|align=right|width=300}} | |||
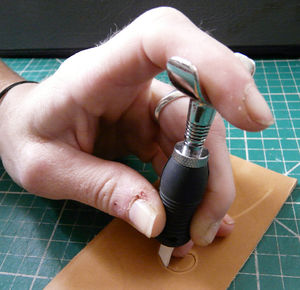
Rest the knife perpendicular to the cased leather and apply pressure with your index finger and draw the knife towards you to make a simple straight cut. To curve the cut the basic action is exactly the same but as you draw it towards you to roll the barrel between your fingers and thumb to turn the blade to either side. Initially you may find it easier to make a slight curve, stop and lift the blade clear, turn the leather on your work surface and carefully reposition the blade before continuing your cut. | |||
{{CaptionedImage|file=Fig76.jpeg|align=right|width=300}}<br/> | |||
It is generally easier to pivot around your little finger, so clockwise for left-handers and anti-clockwise for right-handers.<br/> | |||
<br/> | |||
=Mallet (or Maul)= | |||
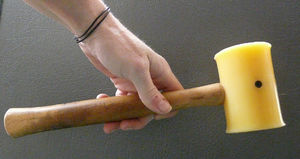
To use a mallet (or maul if you prefer) for tooling the grip is often subtly different that if you were making a firm strike for setting for example. Generally softer grip is used, one that allows you to feel the feedback through from the leather. By that I mean actually feeling how tough the leather is, whether it is resisting the tool’s impression, whether it is solid or soft, springy or firm. It is a hard thing to describe, but trust me when I say it’s an even harder thing to feel yourself if you got your mallet in some kind of death grip. | |||
It is rare that you will need to use much more that a firm tap for tooling, and most often it will be a gentle tapping bounce that drives the tool against the leather. As such a gentle, balanced and flexible grip is essential, in addition to the fact that you will find it far more comfortable to sustain for a potentially long period of time. | |||
{{CaptionedImage|file=Fig78.jpeg|align=right|width=300}} | |||
Personally I tend to barely grip the haft of the mallet at all and pretty much just balance it on my middle and ring fingers, using my wrist to provide the motion and my index finger and thumb to control it. Some people grip it more firmly; others hold it further down the haft or even by the head itself. Again, there is no real right or wrong way, only the way you find most comfortable, but relaxed control and feel are key, not power.<br/> | |||
<br/> | |||
=Beveller= | |||
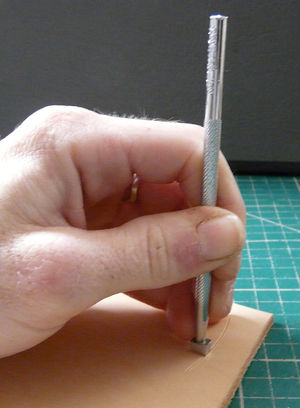
Exactly how you hold the tool is another matter of personal preference, much like the mallet. Generally it should be gripped between the thumb and side of the index finger, with the tip of you middle and ring finger used as further support. Depending on the curve of the line I will tend to have my little finger both sticking out and resting on the leather, to pivot round for a large curve, or resting underneath my ring finger for tight curves or long straight lines. | |||
{{CaptionedImage|file=Fig80.jpeg|align=right|width=300}} | |||
The two main points are to be holding the tool perpendicular to the leather and not to have it in a tight grip that will only serve to make your hand ache after a few minutes.<br/> | |||
The tip of the beveller should rest lightly in the cut and be struck directly down into the leather.<br/> | |||
With each strike your fingers should act like a spring to return the tool to the same height, just resting on the surface of the leather. In this manner you gradually move along the line, being guided by the tip of the beveller along the cut. Whether you draw the tool towards you or away from you is entirely a matter of preference and you may find it equally as comfortable going either way; some people even prefer to curl their arm round so that they are working from side to side with the tool facing them. There is no right or wrong way, only your way.<br/> | |||
To start with you may find it easier to take it slowly, step by step, a tap at a time. Strike. Move the tool. Strike. Move the tool. Strike. Making a conscious placement of the beveller between each strike. As you practice and get more comfortable with the action and confident with your grip on the beveller, you will find you think less about exactly where you place the beveller and begin to slide it gently across the surface as you go.<br/> | |||
The ultimate in control is when you don’t need to use the tip in the cut as a guide but can hover the tool just above the leather’s surface and still follow the line smoothly.<br/> | |||
{{CaptionedImage|file=Fig83.jpeg|align=right|width=200}} | |||
It is advisable not to move the tool too far between each strike, instead allow each one to overlap the previous by at least half. This will help to eliminate edge marks and the second strike will help to even out the tool mark from the first and so on. | |||
Also essential in eliminating tool marks is maintaining an even strength to your mallet strikes. One random heavier strike will leave a clearly deeper impression of the tool behind that will be harder to smooth out than if you have made a few random lighter blows.<br/> | |||
Textured bevellers are at the same time both easier and more difficult to use. They can be easier as you can find the tool almost biting into the impressions from the previous strike, and so may find it easier to progress evenly along the line. That can also make it harder to maintain a smooth progression as the texture doesn’t allow it to easily slide along the surface, therefore developing the skill of ‘hovering’ the tool is more useful, but at the same time can give rise to mis-strikes.<br/> | |||
<br/> | |||
===Common Problem=== | |||
Other than tool impressions being left along the line of the work, the most common problem with bevelling is a mis-strike. This is where the tool does not follow the line and either makes an impression slightly off to one side or the other. | |||
{{CaptionedImage|file=Fig84.jpeg|align=left|width=200}} | |||
If you are lucky and mis-strike on the bevelled side then it can be blended in with a few graduated strokes over it along the correct line of the cut. If the tool has strayed into the clean area of the design, then it’s a little harder to hide. Careful rubbing over with the smooth back of the spoon end of a stylus can blend light mis-strikes in, but be warned that this does subtly change the surface of the leather and will possibly be made even more noticeable with dyeing; especially antiquing which is designed to show up irregularities of the leather’s surface.<br/> | |||
To be honest, unless you are going to attempt to re-cut your line and completely re-bevel it, I would leave the mis-strike as it is. These things happen, it’s not a flaw, it’s a design feature.<br/> | |||
===Additional Tip=== | |||
If you do find that you are leaving minor tool impressions behind, it can be beneficial to run the beveller back over your work, using a firm, regular pressure to help smooth them out before you continue on with the next section. Alternatively, once all the bevelling has been done you can go over the entire thing with the ‘spoon’ end of a stylus. In much the same way, using the smooth back of it to even out any marks, though if it is in an area you will later be backgrounding it’s not really necessary; the textured background will hide the majority of marks made by a beveller. This is only tip is only really relevant to smooth bevelling.<br/> | |||
=Backgrounder= | |||
The strikes required will be generally heavier that for bevelling but other than that the method for holding the tool is the same. | |||
Likewise the aim is, as far as possible, not to leave individual tool marks but a evenly textured surface; remember, it is easier to blend in a lighter area by going over it again but the only way to blend in a single heavy hit it to go over everything to match it. | |||
{{CaptionedImage|file=Fig87.jpeg|align=right|width=200}} | |||
As you will be covering a block area rather than following a single line there often won’t be a cut line to follow, unlike bevelling. This generally means that it is worth cultivating the ‘hovering’ action of the tool, holding and returning it to a point just above the surface of the leather after each strike. In this manner you are freer to move your hand to influence the area of effect.<br/> | |||
{{CaptionedImage|file=Fig90.jpeg|align=left|width=200}} | |||
Whilst this can take a measure of control that may take time to acquire, it’s not always important to be neat and ordered when backgrounding. In fact there are times when having a much more random movement can actually be beneficial. | |||
Generally if you are filling in a small area it can be worth following the bevelled perimeter and gradually work your way inwards.<br/> | |||
For larger areas, or when you are fading the background effect out to the surface of the leather then small circular, or more random, movements can give you a better overall effect; it is also more likely to blend in any accidental individual tool marks. | |||
<br/> | |||
=Pear Shader= | |||
Pear shaders are held the same way as the previous tools but perhaps with a slightly stronger grip. This will enable you to smoothly move the tool over the surface of the leather as there are generally no cuts to guide you; though many designs may allow for a light dotted line to show roughly where to shade (see Tracing).<br/> | |||
{{CaptionedImage|file=Fig93.jpeg|align=left|width=200}} | |||
Strike strength will vary greatly depending on how deep a depression you wish to make. Remember the larger the surface area of the tool the harder the strike will need to be to make a significant impression and vice versa. <br/> | |||
It can be used with just a single hit, or a series of strikes, gradually becoming softer as you move the tool. Due to its convex shape it is far less likely to leave a distinct edge to the tool mark, it can be easily blended in to the regular finish of the leather due to the smoothness with which it can be glided over the surface.<br/> | |||
With textured shaders you don’t get the same glide and so must hover the tool to move it smoothly. | |||
There is no real right or wrong way to use a shader so experiment away. You can create some fantastic undulating textures just by randomly moving it about, gliding it along or even twisting it in your grip as you strike.<br/> | |||
[[Category:Leatherworking]] | [[Category:Leatherworking]] | ||
[[Category:Tooling]] | [[Category:Tooling]] | ||
Revision as of 20:46, 8 October 2012
Casing
For leather to be tooled it ideally needs to first be cased, which is an old, technical and clever term for getting it wet. The reason it has an old, technical and clever term for it is because, unfortunately it’s not just any old kind of ‘wet’.
There are a number of ways of casing leather, some of which are a bit misleading. Firstly the idea of submerging leather and then sealing it in an airtight container or bag for 24 hours isn’t really casing it; it’s just soaking it! This is because, being airtight, none of the excess moisture can escape so you may as well have just dunked your leather in a bath and proceeded to tool it immediately; the results of which would be just as poor as the leather would be far too wet and soft to hold any definition.
In broad terms, to case leather it should be briefly submerged in luke warm water; the amount of time is entirely dependent on the density and thickness of the leather. Very fine leather will require just a quick pass through the water, whereas thicker, heavier weight leather should be left submerged until the rate of bubbles rising from the flesh side begins to slow. It should then be allowed to breathe, either simply placed to one side or traditionally it was placed in a wooden box (the wood would possibly absorb some of the moisture evaporated from the leather and the boxes certainly weren’t airtight).
This period of ‘resting’ allows the moisture to fully penetrate even into the deep fibres of the leather and be retained there whilst the surface is allowed to dry. The leather is ready to be worked when the surface has returned to its original colour but still feels cool when placed against your skin due the moisture retained within.
The dryer surface will provide resistance to the swivel knife and tools, thereby remaining crisp; the softened fibres within will be easily compressed by your tool’s impact and remain that way.
That said, the main traditional reason for properly casing leather for tooling is that when the surface is sufficiently dry, and the inner fibres sufficiently moist, the surface will colour through and ‘bruise’ when the inner fibres are compacted; giving a variety of shades to the natural colour of the leather.
To case or not to case?
If you are intending on keeping the natural colour of the VegTan leather and are simply going to use a clear seal over it once your work is complete, then properly casing it first will give you the finest results.
Likewise if you are intending on moulding the leather then the methods used for casing (with some temperature variants) can be used.
However, if you are simply going to be dyeing over the leather with any colour, the subtlety of the natural shading is going to be lost, so is it really worth all the preparation? In all honesty, no; I don’t believe it is.
Dampening
A simple plant mister or spray bottle, preferably one with an adjustable nozzle or as fine a spray as possible and plain tap water. This is all I’ve ever really used for tooling leather that is later going to be dyed. Simply spray the entire piece of leather you are going to be working on until it is evenly covered and there is minimal water sitting on the surface; though how much you actually spray will depend on how thick the leather is.
For fine grade, thin leather just a quick pass over will be sufficient, for thicker ‘armour’ leather (3mm and above) it is best to aim for some remaining on the surface and allow it to soak in completely prior to starting work.
What you don’t want is for the surface to be too wet. Yes this will mean it is much easier to mark and cut, but this is because it is softer and therefore won’t provide as crisp or clean lines and even the most minor of tooling mistakes will be shown; even nail marks where you have rested you hand can be picked up!
You are aiming for the surface to be ‘just damp’ when you start work. In that way you will have time to progress before you need to spray it again; which on a large piece you will need to do repeatedly.
As you work you should begin to feel it becoming slightly tougher, your strikes need to be a little harder and the feedback has a little more bounce to it. This is when the inner fibres are drying out and it’s time to give it the once over with the spray again. This is an acquired skill that will develop over time. Though sadly this will not be made any easier by the simple fact you are working with a natural material, meaning that each hide will have its own variations. Sorry about that.
You can dampen your leather with a wet sponge or cloth instead. However it can be more difficult to provide an even coverage in addition to often making the leather too wet and needing to wait longer for it to dry prior to starting work.
Additional Tip
Make sure you dampen the entire piece you are working on and not just the section you are intending to tool. This will avoid the creation of water or tide marks that, more often than not, will continue to show through as variations once the leather has been dyed.
Marking
There are a number of different ways to mark your design onto your leather. Each has their advantages and disadvantages and the success of some are unfortunately dependant on how artistic you are.
Freehand
Either in pencil prior to dampening your leather or with a plain stylus after you have dampened it. With a light pressure draw your design directly onto the surface of the leather. The advantage in this is you can either incorporate natural flaws in the piece of leather or tailor your design to make the best use of the space available as well as creating a truly unique piece. The disadvantage can also be that it will be unique, therefore replicating a complex freehand designs can prove to be difficult. It also, unfortunately for some, requires you be able to draw in some capacity.
Craftaid
A ‘Craftaid’ is a preformed template, usually made of plastic (though you can make your own in wood or leather) where the basic lines of a design appear as raised ridges. Once you have dampened your leather you simply place the Craftaid face down where you would like the design to be and evenly apply pressure to the reverse side of it, either with your hand, spoon end of a stylus or even gently tapping it with your mallet. Lift the Craftaid off and it will have formed a series of depressions all ready for cutting. It's that simple. The advantage in these is that it enables anyone, regardless of any drawing ability, the opportunity to tool a design, some of which can be quite complex. The disadvantage is that they are each fixed and so cannot be made slightly smaller or larger to fit your piece of work.
Tracing
This is the general method of transferring designs to leather. The best medium to used is tracing film as it is unaffected by the dampness of the leather that would otherwise cause tracing paper to easily tear, it also stands up well to repeated used over the same design. However, with care, good quality tracing paper can be used, though generally not for more than a couple of reproductions. First trace your design from the original onto the film. I would recommend using a pencil as some pens only work sporadically on film and additionally can cause transference of the ink to the leather. Pencil can also sometimes transfer to the leather, but is easily removed simply through the actions of tooling and so will not impair the final dyed finish. Once you have dampened your leather rest the film with the design in the desired position then simply re-trace over it. This can be done again with a pencil or a stylus or even with a ball point pen (it doesn’t matter if it won’t mark the film). Be careful not to move the film whilst you are tracing the design. When done simply lift it away and you will be left with a slightly darker, bruised mark where the pressure has transferred the design to the leather. This is the most versatile method of transferring designs and one that allows you to use a vast array of original source images to turn into tooled work. Clever moving and re-tracing of a repeating design can enable you to go from straight sections to round curves. Likewise, with some artistry, you can specifically tailor a design to make the best use of available space within your overall template. Best of all, you can do it again, and again, and again.
Additional Tip
If you wish to create a matched, mirror image of your design, you do not need to redraw it, simply turn the film over and re-trace from the other side. This is where you can run the risk of ink transfer to the surface of the leather.
Swivel Knife
To use a swivel knife you rest your index finger across the rest and lightly grip the barrel between your middle and ring fingers and your thumb as illustrated.
Rest the knife perpendicular to the cased leather and apply pressure with your index finger and draw the knife towards you to make a simple straight cut. To curve the cut the basic action is exactly the same but as you draw it towards you to roll the barrel between your fingers and thumb to turn the blade to either side. Initially you may find it easier to make a slight curve, stop and lift the blade clear, turn the leather on your work surface and carefully reposition the blade before continuing your cut.
It is generally easier to pivot around your little finger, so clockwise for left-handers and anti-clockwise for right-handers.
Mallet (or Maul)
To use a mallet (or maul if you prefer) for tooling the grip is often subtly different that if you were making a firm strike for setting for example. Generally softer grip is used, one that allows you to feel the feedback through from the leather. By that I mean actually feeling how tough the leather is, whether it is resisting the tool’s impression, whether it is solid or soft, springy or firm. It is a hard thing to describe, but trust me when I say it’s an even harder thing to feel yourself if you got your mallet in some kind of death grip. It is rare that you will need to use much more that a firm tap for tooling, and most often it will be a gentle tapping bounce that drives the tool against the leather. As such a gentle, balanced and flexible grip is essential, in addition to the fact that you will find it far more comfortable to sustain for a potentially long period of time.
Personally I tend to barely grip the haft of the mallet at all and pretty much just balance it on my middle and ring fingers, using my wrist to provide the motion and my index finger and thumb to control it. Some people grip it more firmly; others hold it further down the haft or even by the head itself. Again, there is no real right or wrong way, only the way you find most comfortable, but relaxed control and feel are key, not power.
Beveller
Exactly how you hold the tool is another matter of personal preference, much like the mallet. Generally it should be gripped between the thumb and side of the index finger, with the tip of you middle and ring finger used as further support. Depending on the curve of the line I will tend to have my little finger both sticking out and resting on the leather, to pivot round for a large curve, or resting underneath my ring finger for tight curves or long straight lines.
The two main points are to be holding the tool perpendicular to the leather and not to have it in a tight grip that will only serve to make your hand ache after a few minutes.
The tip of the beveller should rest lightly in the cut and be struck directly down into the leather.
With each strike your fingers should act like a spring to return the tool to the same height, just resting on the surface of the leather. In this manner you gradually move along the line, being guided by the tip of the beveller along the cut. Whether you draw the tool towards you or away from you is entirely a matter of preference and you may find it equally as comfortable going either way; some people even prefer to curl their arm round so that they are working from side to side with the tool facing them. There is no right or wrong way, only your way.
To start with you may find it easier to take it slowly, step by step, a tap at a time. Strike. Move the tool. Strike. Move the tool. Strike. Making a conscious placement of the beveller between each strike. As you practice and get more comfortable with the action and confident with your grip on the beveller, you will find you think less about exactly where you place the beveller and begin to slide it gently across the surface as you go.
The ultimate in control is when you don’t need to use the tip in the cut as a guide but can hover the tool just above the leather’s surface and still follow the line smoothly.
It is advisable not to move the tool too far between each strike, instead allow each one to overlap the previous by at least half. This will help to eliminate edge marks and the second strike will help to even out the tool mark from the first and so on.
Also essential in eliminating tool marks is maintaining an even strength to your mallet strikes. One random heavier strike will leave a clearly deeper impression of the tool behind that will be harder to smooth out than if you have made a few random lighter blows.
Textured bevellers are at the same time both easier and more difficult to use. They can be easier as you can find the tool almost biting into the impressions from the previous strike, and so may find it easier to progress evenly along the line. That can also make it harder to maintain a smooth progression as the texture doesn’t allow it to easily slide along the surface, therefore developing the skill of ‘hovering’ the tool is more useful, but at the same time can give rise to mis-strikes.
Common Problem
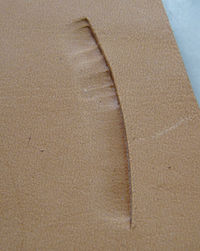
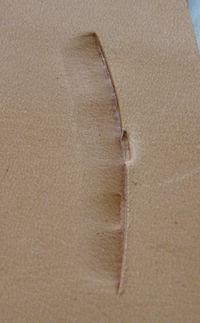
Other than tool impressions being left along the line of the work, the most common problem with bevelling is a mis-strike. This is where the tool does not follow the line and either makes an impression slightly off to one side or the other.
If you are lucky and mis-strike on the bevelled side then it can be blended in with a few graduated strokes over it along the correct line of the cut. If the tool has strayed into the clean area of the design, then it’s a little harder to hide. Careful rubbing over with the smooth back of the spoon end of a stylus can blend light mis-strikes in, but be warned that this does subtly change the surface of the leather and will possibly be made even more noticeable with dyeing; especially antiquing which is designed to show up irregularities of the leather’s surface.
To be honest, unless you are going to attempt to re-cut your line and completely re-bevel it, I would leave the mis-strike as it is. These things happen, it’s not a flaw, it’s a design feature.
Additional Tip
If you do find that you are leaving minor tool impressions behind, it can be beneficial to run the beveller back over your work, using a firm, regular pressure to help smooth them out before you continue on with the next section. Alternatively, once all the bevelling has been done you can go over the entire thing with the ‘spoon’ end of a stylus. In much the same way, using the smooth back of it to even out any marks, though if it is in an area you will later be backgrounding it’s not really necessary; the textured background will hide the majority of marks made by a beveller. This is only tip is only really relevant to smooth bevelling.
Backgrounder
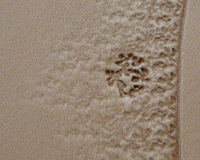
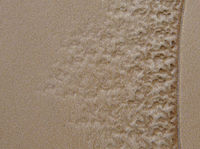
The strikes required will be generally heavier that for bevelling but other than that the method for holding the tool is the same. Likewise the aim is, as far as possible, not to leave individual tool marks but a evenly textured surface; remember, it is easier to blend in a lighter area by going over it again but the only way to blend in a single heavy hit it to go over everything to match it.
As you will be covering a block area rather than following a single line there often won’t be a cut line to follow, unlike bevelling. This generally means that it is worth cultivating the ‘hovering’ action of the tool, holding and returning it to a point just above the surface of the leather after each strike. In this manner you are freer to move your hand to influence the area of effect.
Whilst this can take a measure of control that may take time to acquire, it’s not always important to be neat and ordered when backgrounding. In fact there are times when having a much more random movement can actually be beneficial.
Generally if you are filling in a small area it can be worth following the bevelled perimeter and gradually work your way inwards.
For larger areas, or when you are fading the background effect out to the surface of the leather then small circular, or more random, movements can give you a better overall effect; it is also more likely to blend in any accidental individual tool marks.
Pear Shader
Pear shaders are held the same way as the previous tools but perhaps with a slightly stronger grip. This will enable you to smoothly move the tool over the surface of the leather as there are generally no cuts to guide you; though many designs may allow for a light dotted line to show roughly where to shade (see Tracing).
Strike strength will vary greatly depending on how deep a depression you wish to make. Remember the larger the surface area of the tool the harder the strike will need to be to make a significant impression and vice versa.
It can be used with just a single hit, or a series of strikes, gradually becoming softer as you move the tool. Due to its convex shape it is far less likely to leave a distinct edge to the tool mark, it can be easily blended in to the regular finish of the leather due to the smoothness with which it can be glided over the surface.
With textured shaders you don’t get the same glide and so must hover the tool to move it smoothly.
There is no real right or wrong way to use a shader so experiment away. You can create some fantastic undulating textures just by randomly moving it about, gliding it along or even twisting it in your grip as you strike.
