How to - Make a furred mantle
m (Rafferty moved page How to - Make an awesome furry mantle to How to - Make a furred mantle without leaving a redirect) |
|||
| (3 intermediate revisions by one other user not shown) | |||
| Line 1: | Line 1: | ||
===How to make a | ===How to make a fur-trimmed mantle=== | ||
[[File: | [[File:arming2.JPG|400px|thumb|left|furry cloak]] | ||
Winter is coming... Stay cosy! | |||
TIP: always cut fur or fake fur with a scalpel or Stanley knife from the wrong (leather) side. Scissors will cut the pile and leave it looking messy and weird. | |||
===You will need=== | ===You will need=== | ||
* | * 3m of fabric which is 60 inches wide. Wool, the thicker and softer the better. Ebay is your best bet for this - try searching for wool coating in the colour of your choice - often remnants are available in 3m lengths for about £15. You probably won't do better than this in the shops, but the sales are good. (http://history-explorer.co.uk/ does lovely heavyweight wool for £5-6 per metre) | ||
* Thread in a matching or darker colour. (TIP: if you think you might dye the garment later, get cotton or silk thread. Normal sewing thread won't dye and you'll end up with visible stitching. Coats cotton thread is very good. Guterman quilting cotton thread is too coarse.) | * Thread in a matching or darker colour. (TIP: if you think you might dye the garment later, get cotton or silk thread. Normal sewing thread won't dye and you'll end up with visible stitching. Coats cotton thread is very good. Guterman quilting cotton thread is too coarse.) | ||
* Bias binding | * Fur. Cheap option: an old fur coat, or a fur collar from a charity shop. Expensive option, a coyote pelt from http://www.houseofdeclifford.com - try their coyote seconds or thirds, or the backs or pieces, depending on your budget (these pelts are from necessary culls in north America - House of Declifford have an excellent reputation as an ethical supplier). | ||
* | *Bias binding - about 9m. c=2πr, so you can work it out exactly if you want. | ||
*A fastener or brooch | |||
<p>TIP: often charity shops won't display fur collars or coats, but if you ask they'll usually bring them out from the back room. You can also leave your details and they'll call you when they get one donated. | |||
====Total cost - about £15-20 for wool. £10 for an old fur coat, or £20 upwards for coyote fur==== | |||
First - take a look at this picture: | |||
[[File:Semicircle.png ]] | |||
<br>This is the basic shape of your cloak, where r=the width of your fabric. If your fabric is very long and you're not, you might want to make your circle a little smaller, but in fact you're as well to do that at the end when you hem it, as you lose quite a bit of length as you go. 60inch wide fabric makes a good cloak for most people, varying from ankle to mid calf length depending on your height. If your fabric has a nice finished edge (selvage) you can position the long flat edge along it, which saves you having to have to hem the front edges. | |||
<br>For your head to go through, you'll need to cut another, smaller semicircle as shown: | |||
[[File:Semicircle2.png]] | |||
<br>Make this hole smaller than you think - 3 inch radius is a good start, and gradually widen it out if that's not enough, but remember when you bind or hem the neck edge it'll get bigger. | |||
<br>Bind your neck edge and hem with bias binding for a neat finish, or just turn a hem, accepting that it'll go bobbly. Here's why you should do it with bias tape: | |||
http://tutorials.abbott.me.uk/home/bias-tape | |||
http:// | |||
<br>At this point, you can stop, and have a cloak which looks like this: | |||
[[File:Seneschal2.jpg|400px|thumb|left|no fur on this one]] | |||
====Putting the fur on==== | |||
<b>Coyote version:</b> | |||
<br>Put your cloak on, and position the coyote pelt over your shoulders with the face on one side and the tail on the other - they should hang about level with each other, but sometimes it looks a bit better if it's asymmetric. Put a couple of pins in at either side, and one right at the nape of your neck to hold the pelt in place (a friend can help here). | |||
<br>Slip the cloak off, and stitch from the centre back around to the front, oversewing the edge of the pelt and the edge of your cloak. Leather needles can help here, or a thimble to drive it through. You might find a few tacking stitches holding the face and tail of the pelt to the front edges of your cloak helps. | |||
<br>Add a brooch or fastener to hold it shut. Two matching brooches and a chain is a nice way of holding it on over your armour. | |||
<br> | <b><br>Old Fur Coat Version</b> | ||
http://tutorials.abbott.me.uk/stay-warm/furry-cloak | |||
And there it is! Done! You've made an awesome furry cloak. | |||
[[File: | [[File:Earl.JPG|400px|thumb|left|furry joy!]] | ||
===What else can I do with this pattern?=== | ===What else can I do with this pattern?=== | ||
* | * Make it in different colours! Line it for extra cosiness! | ||
*You could use fake fur if you prefer - choose the expensive stuff, often in the bridal section, as it looks and wears much better. Cut a semicircle of smaller radius than your cloak, with the long straight edge along one of the CUT edges of your fur fabric, not the selvage. You can then cut out the same neck semicircle and sew the fur fabric to the cloak fabric right side to right side along the neck edge. You can hem the front edges together or separately. | |||
[[Category:Costume]] | [[Category:Costume]] | ||
Latest revision as of 15:23, 12 January 2022
How to make a fur-trimmed mantle
Winter is coming... Stay cosy!
TIP: always cut fur or fake fur with a scalpel or Stanley knife from the wrong (leather) side. Scissors will cut the pile and leave it looking messy and weird.
You will need
- 3m of fabric which is 60 inches wide. Wool, the thicker and softer the better. Ebay is your best bet for this - try searching for wool coating in the colour of your choice - often remnants are available in 3m lengths for about £15. You probably won't do better than this in the shops, but the sales are good. (http://history-explorer.co.uk/ does lovely heavyweight wool for £5-6 per metre)
- Thread in a matching or darker colour. (TIP: if you think you might dye the garment later, get cotton or silk thread. Normal sewing thread won't dye and you'll end up with visible stitching. Coats cotton thread is very good. Guterman quilting cotton thread is too coarse.)
- Fur. Cheap option: an old fur coat, or a fur collar from a charity shop. Expensive option, a coyote pelt from http://www.houseofdeclifford.com - try their coyote seconds or thirds, or the backs or pieces, depending on your budget (these pelts are from necessary culls in north America - House of Declifford have an excellent reputation as an ethical supplier).
- Bias binding - about 9m. c=2πr, so you can work it out exactly if you want.
- A fastener or brooch
TIP: often charity shops won't display fur collars or coats, but if you ask they'll usually bring them out from the back room. You can also leave your details and they'll call you when they get one donated.
Total cost - about £15-20 for wool. £10 for an old fur coat, or £20 upwards for coyote fur
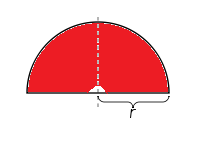
First - take a look at this picture:

This is the basic shape of your cloak, where r=the width of your fabric. If your fabric is very long and you're not, you might want to make your circle a little smaller, but in fact you're as well to do that at the end when you hem it, as you lose quite a bit of length as you go. 60inch wide fabric makes a good cloak for most people, varying from ankle to mid calf length depending on your height. If your fabric has a nice finished edge (selvage) you can position the long flat edge along it, which saves you having to have to hem the front edges.
For your head to go through, you'll need to cut another, smaller semicircle as shown:

Make this hole smaller than you think - 3 inch radius is a good start, and gradually widen it out if that's not enough, but remember when you bind or hem the neck edge it'll get bigger.
Bind your neck edge and hem with bias binding for a neat finish, or just turn a hem, accepting that it'll go bobbly. Here's why you should do it with bias tape:
http://tutorials.abbott.me.uk/home/bias-tape
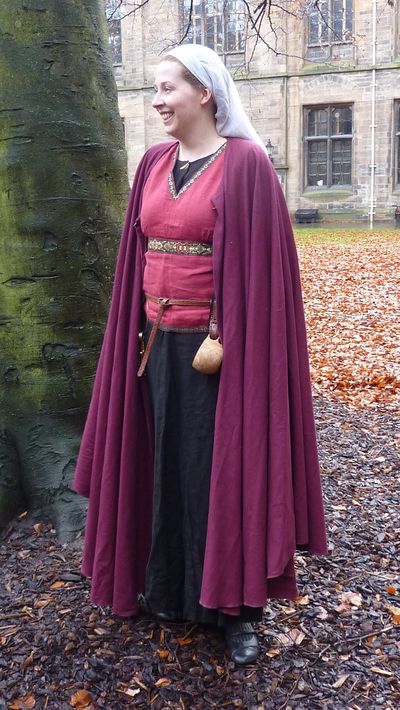
At this point, you can stop, and have a cloak which looks like this:
Putting the fur on
Coyote version:
Put your cloak on, and position the coyote pelt over your shoulders with the face on one side and the tail on the other - they should hang about level with each other, but sometimes it looks a bit better if it's asymmetric. Put a couple of pins in at either side, and one right at the nape of your neck to hold the pelt in place (a friend can help here).
Slip the cloak off, and stitch from the centre back around to the front, oversewing the edge of the pelt and the edge of your cloak. Leather needles can help here, or a thimble to drive it through. You might find a few tacking stitches holding the face and tail of the pelt to the front edges of your cloak helps.
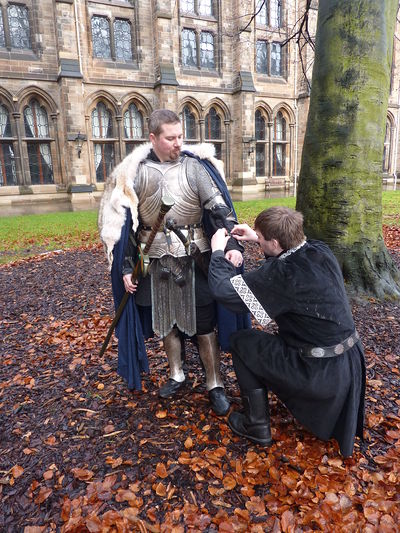
Add a brooch or fastener to hold it shut. Two matching brooches and a chain is a nice way of holding it on over your armour.
Old Fur Coat Version
http://tutorials.abbott.me.uk/stay-warm/furry-cloak
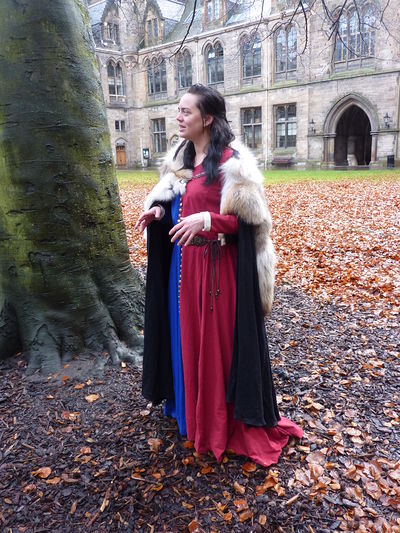
And there it is! Done! You've made an awesome furry cloak.
What else can I do with this pattern?
- Make it in different colours! Line it for extra cosiness!
- You could use fake fur if you prefer - choose the expensive stuff, often in the bridal section, as it looks and wears much better. Cut a semicircle of smaller radius than your cloak, with the long straight edge along one of the CUT edges of your fur fabric, not the selvage. You can then cut out the same neck semicircle and sew the fur fabric to the cloak fabric right side to right side along the neck edge. You can hem the front edges together or separately.


