Archive:Basic Skills
Hole Punching.
Why:
Holes are wonderful things. Rivets need them, lacing needs them, they can make sewing easier and yet whilst being so useful, they can also be a repetitive pain.
When:
Generally it’s worth marking where your holes are needed just prior, or at the same time are marking on any design (especially if tooling VegTan leather), but it can be advisable to leave off actually punching them until the leather has been dyed and finished. Whilst damp leather can be slightly easier to cut (and therefore punch through) if you apply dye to pre-punched leather it will obviously soak through the holes and bleed onto the reverse (grain) side. This is not necessarily an issue and is not overly wasteful, however unless the underside is then also sealed the colour can be prone to transferring to items being worn underneath. When punching holes for rivets, snaps and eyelets it is best for them to be as snug a fit as possible. Line the post of the rivet etc up alongside the stem of your punch to assess the fit. Be aware when using thinner leathers and suede there can be a small amount of stretch to it, so it is best err on the side of caution; you can always punch again, larger, if needed, but you can’t put bits back to make it smaller.
Where:
Holes can be punched pretty much anywhere you can get a punch to, which is why drive punches are much more versatile than a rotary punch; which can only reach a small way in from the edge.
How:
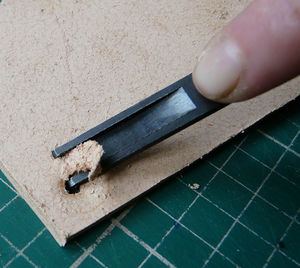
Unless you’re using a rotary punch, always place something underneath the leather you are punching through. Not just to protect your work surface, but also to prolong the life of the punch; one strike against a stone block and that’s the end of your drive punch. Card isn’t really suitable for this, though a very thick piece of scrap leather (or a stack of thinner pieces) will work as a minimum; cutting mats for knives are generally too thin as you run the risk of driving the punch right through it with a solid mallet strike. The best to use is a substantial piece of tough rubber or nylon; a cheap alternative to those sold specifically for this purpose is a good quality nylon, kitchen chopping board. Simply rest the punch over the mark, hold the punch perpendicular to the leather and strike with a mallet. The amount of force required is as variable as leather itself, from a tap to a solid whack. Not just thickness but the type of leather and whereabouts on the hide it is from all play a part in determining its toughness. Practice will enable you to judge, but it can be better to err on the side of caution; you can always hit it again, but once you driven your punch all the way through in one hit and blunted the cutting edge , it’s too late.
With a rotary punch the process is almost the same. Simply line up the punch with the mark and apply pressure. Sometimes with rotary punches, especially on thick leather, they can leave a small amount of uncut fibres on the very outside of the hole, meaning the waste section won’t easily come out. A slight rotational twist to either side whilst pressure is applied can give a clean cut.
Additional Tip:
Wherever possible you should punch holes from the facing side of the leather downwards, not from the grain side upwards. As each hole is punched the waste section of leather is forced upwards, through the hollow stem of the punch, and ejected out of the side (or top on a rotary punch). By punching from the facing side down a slight curve is formed on the smooth leather, making it’s passage through the tool’s stem fairly straightforward. This tends not to happen for the grain side and so the waste section is prone to resisting and merely compresses when the next hole is punched; jamming the tool and preventing it cutting properly. If this does happen it can be cleared with very careful application of a bradawl, stylus or similar long, thin, strong piece of metal. However, be warned, if it slips you can risk braking the cutting edge of the punch, rendering it useless, and possibly injure yourself too.
Cutting.
What:
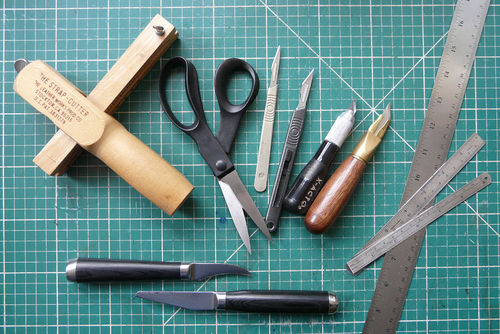
Tools used in this section:
Why:
Well obviously you need to cut and trim a finished piece, but also, unless you are creating something the size of half a cow, it is far easier to remove a rough section from a hide to work on.
When:
Leather can be expensive so, much like with fabric, the best way to get the most out of your material is efficient layout of the pattern. Lay out a template on the reverse (grain) side of the leather, mark it out with a ballpoint pen and use this as your cutting guide prior to marking any design or pattern onto the facing side.
Where:
Large hides can be cut on the floor if you don’t have a table large enough. Make sure to protect the surface underneath, ideally with a specialised cutting mat, though thick card or rubber can serve equally well. This is not just to protect your carpet or table, but also to prolong the usefulness of your knife blade.
How:
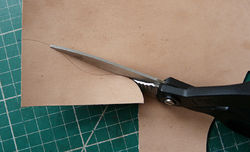
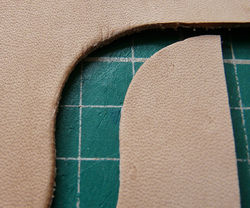
Light leathers can be relatively easily cut by simply using a decent pair of scissors. However care should be taken when cutting smooth surfaced leathers to position the scissors to the outside of item (as illustrated). This will give a clean cut edge rather than one compressed by the scissor blade .
There are shears that are specifically designed to be capable of cutting the heavier weights of leather most often used for LRP projects.
Alternatively a knife can create a cleaner and more versatile cut and if being used to cut a straight line always use a metal ruler; a blade is far less likely to skip across a metal ruler than a plastic one, which can also easily become notched and scored. The toughness of the leather being used, along with the pressure that needs to be maintained to ensure a smooth cut will dictate which kind of knife would be suitable. Scalpels, whilst extremely sharp, are not particularly strong and so would not be recommended for anything other than the lightest of leather. A better alternative would be something similar to an Xacto craft knife with a substantial handle. These will better take the pressure whilst also being fine bladed enough for more intricate shapes. Depending on the thickness of the leather repeated cuts may be needed, but it is generally better to cut slowly, smoothly and more than once than putting excessive pressure on a knife; this will more often than not, result in a jerky, rough cut and be more likely to slip, break or otherwise be potentially dangerous.
Specific leatherworking knives can easily cut through the toughest of leather, however they are not suited to intricate shapes and are best used to remove a section from a large hide to make it easier to work on. Draw-gauge knives, or strap-cutters, are a very quick and easy way to make straps, belts and anything that requires a parallel cut. Simply use a knife/metal ruler to provide the initial straight edge then measure in the desired width of the strap. Again use the knife and ruler to make a starting cut of about 1”-2”; this will enable the leather to be pulled through the strap-cutter slightly to more easily start it off. (On heavier leathers this initial cut is not always required, provided the cutter’s blade is sharp the leather will be cut rather than resist and buckle when pushing it through to start.) Set the strap-cutter to the required width and depth as illustrated, then insert the leather into the initial cut and then pull through to complete the cut.
Release the bolt at the end of the handle, this will allow the cutting gauge to slid through until the desired width is reached. If the leather is excessively thick or thin you can adjust the depth with the small bolt at the end of the cutting gauge and by carefully squeezing closed, or prying open, the blade end with a pair of pliers; keeing it set at about 4mm is generally OK for more leathers. Set the width by matching the measure with the edge of the handle, then simply re-tighten the main bolt.
Ensuring the straight edge is kept firmly butted against the handle of the cutter can have a bit of a knack to it, some people prefer to draw the cutter across the leather whilst holding that firmly, others find it easier to hold the cutter steady whilst pulling or pushing the leather through. As with most things, practice until you find a way that suits you best.
Skiving.
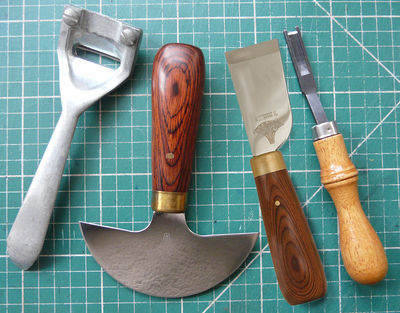
Skiving, rather than just not doing any work, is actually a specialised horizontal cut used to thin leather. It can be done by machine or by hand with a wide range of specialised knives. Ideally it should only be done to the reverse (grain) side of the leather, as the surface (skin) side contain the most densely packed and strongest fibres thereby retaining the most strength possible on a thinned section.
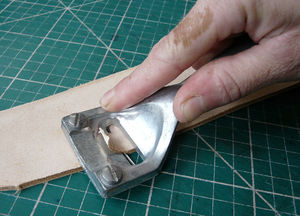
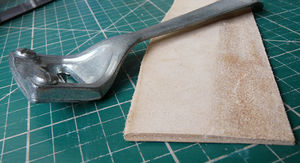
Generally it is most often done along edges where joins are formed, at the end of straps to allow for better fitting of buckles or where handles are to be sewn into place and if done carefully, can even thin a very small area of leather around a punched hole to allow for a depressed, hidden rivet. The latter can also be used to allow a secure set for a snap fastening on leather that would otherwise be slightly too thick for the length of the snap’s post. For skiving an edge along which a stitched or riveted join will be done it is probably most easily achieved with a straight skiving knife or a ‘Super Skiver’ (a handy beginner’s tool sold by Tandy). With a Super Skiver, simply place the leather on a flat work surface and hold firmly in place. Hold the Super Skiver towards one end of the leather, protruding over the edge and resting at a slight angle as illustrated.
Applying enough pressure for the blade to bite into the leather carefully draw the tool towards you, trimming the edge as you go. The depth of the cut (and therefore the thickness of the leather remaining) is dictated both by the amount of downwards pressure exerted and by the angle at which you hold the tool itself; usually between 30 and 45 degrees.
To use a plain skiving knife the action is pretty much the same as the Super Skiver, except you are pushing the blade away from you rather than drawing towards you.
Also there is no guard or other guide on how deep you cut; it is purely down to your own control over the blade itself and holding your leather firmly. One slip and it could easily be ‘that’s all she wrote’ for your work, and possibly your fingers!
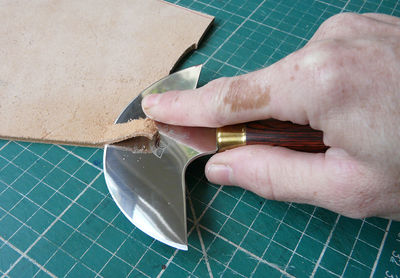
Probably one of the most versatile knives that can be used for skiving is a ‘Head Knife’, also known as a ‘Round Knife’. Skiving, cutting, trimming, all can be done using a head knife, however it is very much an acquired skill that is almost totally unlike using any other kind of blade. Once learnt though, you may wonder why you bothered with so many other knives...
... and yes, even after 20 years I’m still learning different ways of using it!
Held in a similar fashion to a regular skiving knife, a head knife is also pushed away from you rather than drawn towards. However, due to the curve in the blade the angle at which it must be held is far less otherwise you run a far higher chance of simply creating a channel that is much thinner along one area that the other. Also, being a larger blade, it requires more effort to control so you don’t either gouge deeper as you apply pressure or alternatively, simply slip upwards and skip across the leather’s surface; possibly only stopping in your fingers!
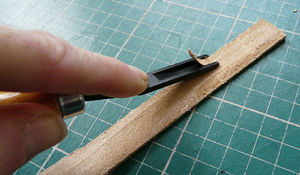
For narrow strips or around rivet holes a ‘French Skiver’ is possibly best and easiest tool to use. It is very similar to an edge beveller, only with a ¼” (6mm) wide blade. Again, this is one that is pushed away from you rather than being pulled towards. Seat the edge of the blade over the cut edge of the leather, apply pressure to start the cut and then push carefully away from you whilst holding the leather firmly with the other hand as illustrated. The depth of the cut is controlled not only by the angle at which you hold the tool (usually about 20-40 degrees) but also by the amount of pressure applied. Take care when making the first pass along the very edge of the leather as it is easy for the blade to dig deeper due to there being no resistance against the tool’s outer edge.
Once you reach the end of the section to be skived, place the blade back at the start, yet this time set it approx half the blade’s width in from the cut edge and proceed as before. This time the leather on the outside edge of the tool will act as a guide to help prevent you cutting too deeply. Continue in this fashion until you have skived the desired width and depth. If you are doing this at the end of a narrow strap (e.g. to allow a better seat for a buckle) then you may find that it will only take three passes with the tool to achieve the full width of the strap. In which case it can sometimes be easier to effectively make two ‘first passes’, one along either cut edge and then make the third down the middle.
To make a depression for a hidden rivet, or to allow a shorter one to be used, first punch the hole. Position the French Skiver exactly as before only instead of seating the edge of the blade over the cut edge of the leather, seat it just inside the rivet hole. As you apply pressure to make the cut carefully pivot the tool around this central point, skiving as you go.
Common problems:
With the Super Skiver the blade itself is held in the tool at a slight curve. Be aware of this when using it to skive a broad section as it will obviously cut deeper at the centre than at the edges.
Additional Tips:
Little and often is the key here. You can always keep going over the leather, removing thin strips each time; you can’t really stick it back on once you’ve slipped and taken a chunk out of your precious work!
Edge Finishing.
What:
Tools used in this section:
Why:
Unless they are being over-laced or otherwise concealed, bevelling and burnishing the edges of a piece can add so much to the finished look and is relatively simple to achieve. It also serves a purpose in enabling straps to more easily pass through loops and buckles without unnecessarily wearing or roughing up the edges. Finally a burnished edge, even without any form of edge dye, is more resistant to moisture entering, opening up the fibres and thereby weakening the leather.
When:
The following techniques of edge bevelling and burnishing are generally only used on VegTan leather and are performed before any dyeing or sealing. Neither is appropriate for suede though bevelling can be undertaken, with care, on bridle leather or the facing side of full grain or oiled leathers.
Where:
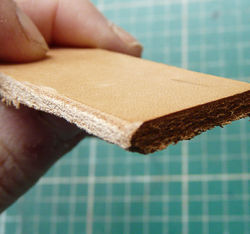
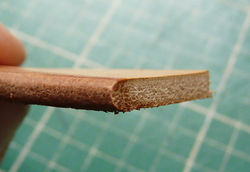
Bevelling effectively trims off the sharp corner along the edge of a knife cut and is most commonly done to both the facing and reverse edges. By burnishing it the edges are further smoothed and rounded off.
How:
Bevelling.
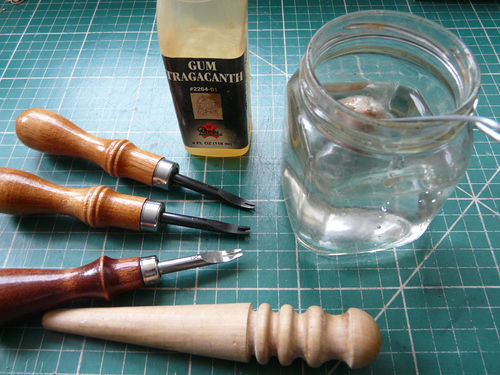
Specific edge bevelling tools come in a variety of sizes, though annoyingly they are generally numbered rather than simply referring to the width of the blade, so here is a rough guide to make your shopping a little easier:
No 1 = 1mm No 2 = 1.5mm No 3 = 2mm No 4 = 2.5mm No 5 = 3mm
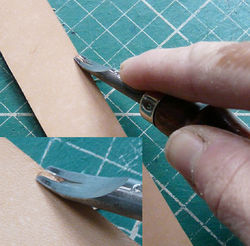
The actual depth of the cut can also be determined by how acute an angle you hold the tool against the leather, but the variation is minimal and not horrendously noticeable if you are also going to be burnishing the edge. The action is simple enough, however it can take some practice when dealing with curves and tight corners. Hold the tool so the corner of the cut leather edge sits snugly against the blade whilst firmly holding the leather in place with your other hand. You then simply push the tool away from you, running along the cut edge, stripping off the corner as you go.
As you come to the end of a stroke you can finish by pushing the blade forwards and away from the leather, lifting it and removing the trimmed strip. Alternatively you can stop dead, without completely removing the trim, readjust your grip on the leather and then continue the next stroke exactly where you left off. It may be appropriate to only bevel the facing edge of a piece, however, on belts or substantial pieces like armour it is useful to also bevel the reverse side. Like much of leatherworking, there is no real ‘right’ or ‘wrong’ way to do it, only the way you are most comfortable with which achieves the desired results.
Burnishing.
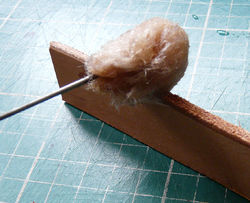
To burnish the edge it first needs to be moistened. This can be done simply with water, however best results are achieved with a product called Gum Tragacanth; this helps the fibres adhere together and can be diluted with water by up to 50%. Draw either a damp sponge or wool dauber gently across the very edge of the leather. Be careful not to soak it or the edge will become too soft. If this does occur just leave the item to dry until it is just damp. Practice will enable to you gauge this.
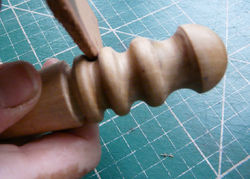
Large items can be held on a steady surface with the part to be worked slightly protruding over the edge. Smaller items can simply be held in one hand and straps or belts can often be propped perpendicular to a work surface. If using a variable burnisher ensure the leather sits easily within the ‘U’ section; too tight a fit and track marks will be left on either side of the leather as it is forced through. Too loose is much less of an issue as with care and gentle angling of the burnisher a reasonable finish can still be achieved.
With the leather held steady, firmly and repeatedly rub the burnisher along the edge until a smooth finish has been achieved. It’s that simple.
Additional Tips.
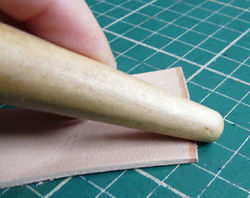
On fine, thin leather it can be difficult to apply enough pressure without the leather buckling. However, if it is placed flat on a work surface a straight burnisher can be angled and rubbed across the uppermost corner as illustrated.
For particularly thick leather that does not fit within the ‘U’ section a similar technique to that described above can be used. Instead of simply laying the leather flat on the work surface, position it near to the edge. Rub the burnisher firmly along the edge, gradually shifting the angle so as to work across the corner and along the bevelled and cut faces as illustrated. Once this has been done on the facing side, simply turn the piece over and repeat on the reverse side.
Setting.
What:
Tools used in this section.
Why:
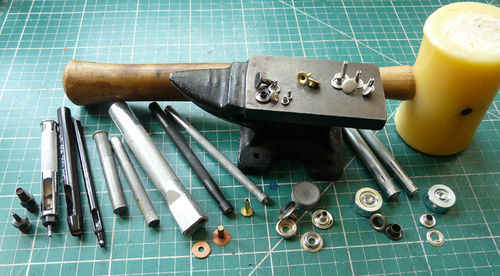
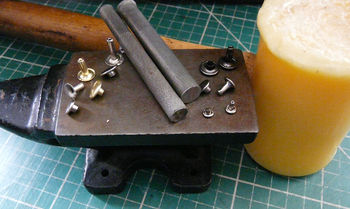
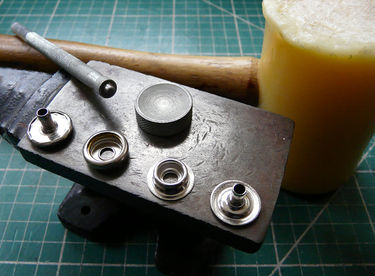
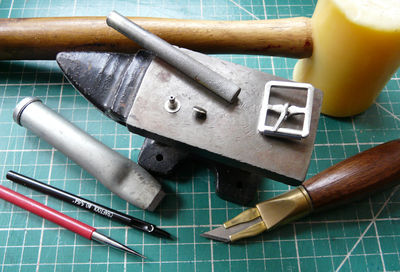
There are a large number of items used in leatherworking that require setting in some form or another, from the structurally essential rivets to decorative gems or other adornments. The basic skill is the same, unsurprisingly, hammering, but both the setting tools and anvils differ, as does the amount of power required.
When:
Generally setting items is one of the final stages in completing a piece either by attaching components together, adding buckles, straps etc or for adding purely decorative pieces. Whilst rivets and eyelets can be dyed over doing so can impair both their finish and that of the dye. Like re-spraying a car, the best results are often achieved by completing each individual component prior to assembly.
Where:
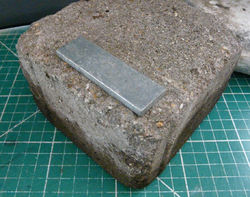
Wherever possible, set rivets on a solid metal surface such as an anvil. Mini 2lb ones are ideal for use on top of a workbench or table but even a small metal plate placed on a brick can do. Unless the anvil is secured to the surface on which it is resting, it can be advisable to place some form of cushioning between the anvil (or brick) and the workbench/table; mostly to avoid the vibrations causing things to bounce or slip.
How:
Rivets.
Riveting is possibly the quickest and simplest method of fastening leather together but not always the most appropriate depending on the look you are trying to achieve. Ensure the holes used are a snug fit and not too loose. This is especially important with lightweight leather and suede; there will be a certain amount of stretch that can make a rivet more likely to pull through under pressure if the hole is already slightly too large. Use the correct length of rivet for the job in hand. This can be of slightly less importance when using ‘Rapid’ rivets, however solid and tubular ones require a certain amount of excess to actually form the ‘set’.
Solid.
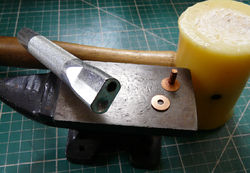
Solid rivets are generally the best choice if you are looking to secure leather to a substantial piece of metal and there is likely to be much rotational movement and/or load bearing, e.g. a strap to a metal greave or breastplate. Any movement of a raw metal edge against the rivet could easily wear through lighter ‘Rapid’ rivets. Insert the rivet through the pieces to be joined so that the flat head is on the facing side and place the washer on the tapered end. Use the hollow part of the setter to drive the washer down to be snugly seated against the surface.
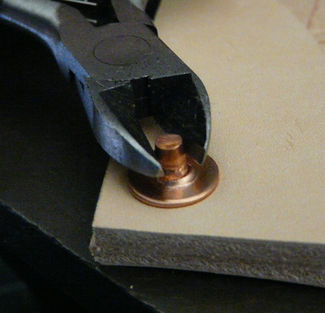
Using a pair of cutters trim the excess to <2mm. It should not be trimmed to be flush to the washer. Using the concave part of the setter hammer the excess flat whilst using a rotational motion with the setter itself. This will form the excess into a mushroom shape and secure it over the washer.
This is one of the few times when using a metal hammer can be better as it gives a sharper blow; additionally the required setter is a fairly robust tool and more capable of taking the abuse than others.
Tubular.
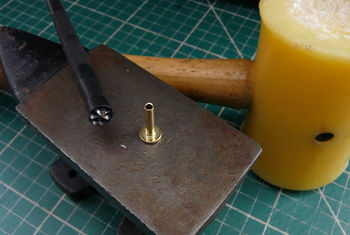
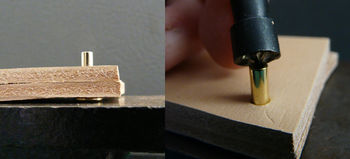
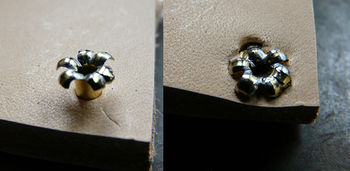
These are relatively strong rivets and often used in many automatic riveting machines. They are suitable for any connection where substantial load bearing is required, e.g. for securing a heavy section of leather to be hung from a belt or when using a single rivet to secure a strap or buckle. They are not particularly suited to any location which is going to be subject to continued rotational movement (such as on articulated items) unless an additional washer is used. This is simply because the peened rivet curls back with potentially sharp edges that will chew away at the reverse side of the leather joint. To gauge the correct size of rivet to use the post should ideally be protruding between 2-3mm. Insert the rivet through the pieces to be joined so that the flat head is on the facing side. Seat the setter snugly into the hollow, open end of the rivet.
Ensuring the setter is held perpendicular to the leather’s surface/anvil strike it firmly with a mallet until the rivet splits and is forced firmly back against the leather.
‘Rapid’ Rivets.
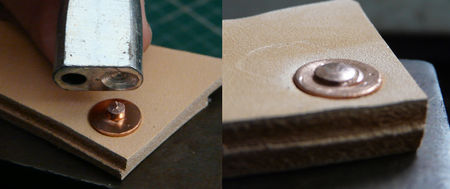
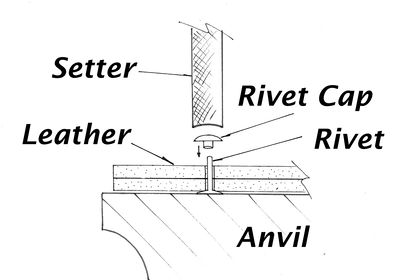
These are possibly the most readily available rivets in a number of finishes, sizes and can be found in both single and double cap varieties. This gives them incredible versatility for use within LRP, from securing decorative items to kit, straps and buckles to joining separate lames of articulated armour. Whilst they are less substantial than tubular rivets they are certainly up to the task for the majority of uses in LRP, especially when a number are used in close proximity, e.g. a triangle of three used to secure straps form breastplates, greaves etc. To gauge the correct size rivet to use the post should ideally be protruding between 1-2mm. Insert the rivet through the pieces to be joined so that the base of the rivet is on the reverse/hidden side of the item and seat the cap onto the protruding end of the rivet. Hold the setter perpendicular to the leather/anvil and strike firmly with a mallet.
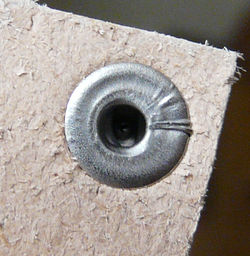
The amount of force required to completely set the rivet can be achieved with a few small taps, a gentle tap then hit or a single whack. It’s personal preference and through practice you will get a feel for it and how you are most comfortable doing it. On an open ended (rather than double capped) rivet you can see through to where the body of the rivet has compressed and flattened to secure the cap.
Additional Tips:
Likewise with these particular rivets they can be set using nothing more than a metal hammer and a hard surface like a brick or paving slab. Watch your fingers and it won’t be the prettiest of finishes (you are highly likely to mark the leather) but it can be done if you don’t have access to the correct tools.
Common Problems:
The main pitfall with these types of rivets is in using one that is too long. With insufficient support to keep the rivet upright it will compress at an angle, skewing the layers that are being secured. That said, whilst this may look unsightly and not be the most structurally strong connection, if it has been mashed together well enough it’s unlikely to separate and so still can serve its purpose.
Snap Fasteners.
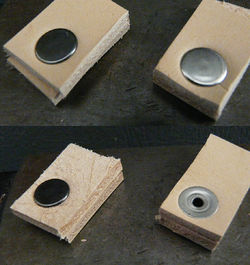
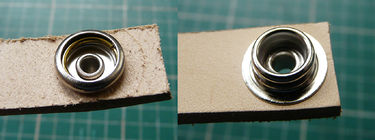
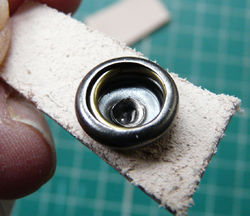
Readily available in a variety of finishes and colours these can provide a relatively simple fastening solution, especially where straps and buckles are either awkward or relatively unnecessary. The holes for these fasteners need not be as snug a fit as for rivets, however, it is wise to avoid making them overly large as this can result in the peened section of the post deforming the male or female cap and thereby giving an insecure set. Ideally the post of both the ‘button’ and base should protrude through the leather by about 1-2mm. On thicker leather careful skiving around the hole can enable these fastenings to be used.
Rest the outer ‘button’ in the concave anvil and locate outermost piece of leather over it, outside facing side down, then place the female cap over the protruding post. Seat the setter snugly into the hollow, open end of the post. Hold the setter perpendicular to the leather/anvil and strike gently to peen the post back against the cap. Rest the base on the flat surface of the anvil and locate the innermost piece of leather over it, inside facing down, then place the male cap over the protruding post. Proceed to set as above.
Additional Tips:
It is better to set these with a series of gentler strikes, occasionally lifting the setter to check the state of the peened post and cap rather than with just a couple of whacks. The posts should curl back neatly against the cap, but it is very easy for them to split to one side or for the hole in the cap to deform or even split; especially if the setter is not exactly perpendicular or if the mallet strikes at a slight angle.
Eyelets.
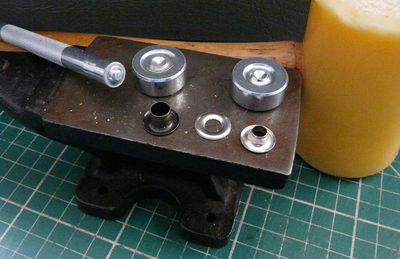
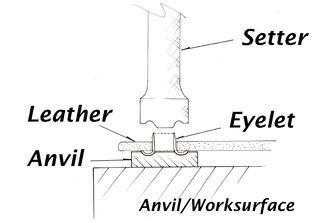
Readily available in a variety of finishes and sizes eyelets are basically reinforcement for holes. They help to stop shape deformation and wear and are most useful when the hole will come under some form of pressure, e.g. from lacing to hold a vambrace closed or sleeve on a jerkin. Choose a size appropriate to whatever is going to be threaded through it but also be aware that ideally they also need to be able to protrude around 2-3mm through the leather to be securely set. Ideally the hole used needs to be as snug a fit to the eyelet as possible, especially on the lighter weight leathers which may have some stretch in them. Mainly because the peened edge only folds back over a small distance and if it is too close to the hole’s edge there is a great risk the eyelet will easily be pulled out. There are versions available with small washers that can alleviate this problem and are perhaps better used with finer leathers for better security. Insert the eyelet through the leather with the facing side outwards. Seat into the shaped anvil and if using a washer, place over the protruding eyelet stem.
Hold the setter perpendicular to the leather/anvil and strike firmly to peen the stem back against the leather or washer. The amount of force required can vary depending on the size of the eyelet and the amount protruding so it’s best to use a few gentle strikes, checking as you go, until you get a feel for it.
Buckles.
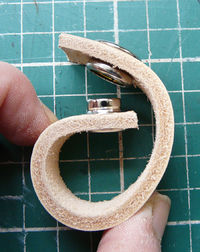
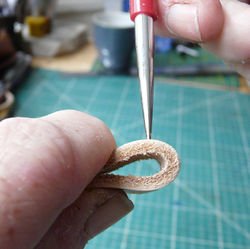
The two main things to be aware of when setting buckles are ensuring enough allowance is provided for both the central bar of the buckle and the full width of the rivet. Too much and the buckle will be loose. It won’t come off, it’ll just be annoying, but it’s better to err on the side of caution; too little and the leather will be too tight around the buckle-bar and there could be difficulty setting the rivet properly. As a rough guide, fold the leather loosely over, leaving enough of a gap that you would otherwise be able to fit the buckle bar in. Make a mark on either side of the fold a couple of mm in then flatten out the leather. These marks will form the endpoints for the prong’s slot.
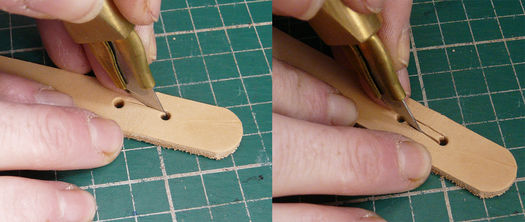
Whilst there are specialist hole punches readily available to make the central slot for the prong, it can be done with a regular hole punch and some careful work with a knife. Use the end points you have just marked to punch two holes the same diameter, or slightly larger, than the buckle’s prong. Then carefully cut between them either using a small ruler or, if you’re more willing to risk your fingers, it can be done freehand. It is probably better to make repeated, light cuts, than use too much pressure and risk slipping. An additional tip is to only cut away from the hole to the centre rather than all the way across from hole to hole. This way is less likely to cause an overcut as illustrated.
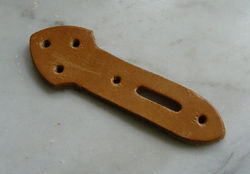
The two rivet holes can then be marked approx 3/8”-5/8” (10-15mm) out from each end of the slot.
Additional Tips:
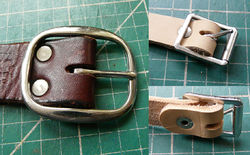
As a guide, for a simple pressed ¾” buckle as illustrated, an average allowance of 1 ¾” (45mm) between the rivet holes is appropriate when using 3mm leather. If you have more than a couple of the same size buckles to set then it can be useful to make a template of either card or leather to save measuring each one individually.
Generally a single rivet is sufficient to hold a buckle in place that is likely to not come under excessive strain. For example holding a pouch/ bag flap shut, or for vambraces and greaves where the load is distributed between a number of straps/buckles. However, for added strength, or for wider straps, additional rivets can be placed either in a line or alongside each other.
If the leather being used is excessively thick where the buckle is to be placed, then it can be skived down from the far end to just prior to the first rivet hole as illustrated. This will obviously weaken the leather slightly so be careful to only remove enough to allow for a comfortable fold over the buckle.
Dyeing.
What:
There is a vast range of dyes, stains, pigments and paints designed for use on leather, and an even wider range of products that aren’t but can still be used. Feel free to experiment but always bear in mind the durability, flexibility and permanence of what you are using.
Why:
On natural VegTan leather used for tooling and carving you will probably want to colour it in some way, be it in a subtle or strong fashion. Even if you wish to keep the natural colour it is recommended you seal the leather to help protect against damage from water and light scuffs. Though you should be aware before choosing to leave a natural finish that VegTan leather will continue to effectively ‘tan’ itself when exposed to natural light and so will continue to darken in tone. This action can therefore cause shadows and highlights if something is placed on top of it (effectively blocking the light) for even a relatively short period of time; as little as an hour under a midday summer sun!
When:
As VegTan leather needs to be cased (sprayed, sponged or soaked with water) for tooling, any dyeing or staining needs to be done once all your work is completed. It is generally advisable to seal items in some way one you have finished working and dyeing VegTan leather. Not only does this help to preserve the surface from damaging watermarks, is can also help prevent any transference of dye both during wear and if the item does get wet (it’s LRP, during a British summer, it’s going to rain at some point). It is also advisable to dye and finish each component prior to any setting of snaps, rivets etc. Not only will you achieve and more even appearance and colour but each item will be more effectively sealed, as opposed to missing areas under straps, riveted joins etc.
Where:
Most dyes, stains and finishes are used across the facing surface of the leather; they are also suitable for use on the reverse (grain) side if it is likely to be exposed to view. However be aware that this side will be slightly more absorbent. There is also a specialist dye, Fiebing’s Edge Dye, which is specifically formulated for, you guessed it, the cut edges of your leatherwork.
How:
Essential tip:
First thing, wear a pair of gloves unless you want to be trying to scour your fingers with acid and a wire brush for the next two days! Disposable latex ones are fine if you are using Antique or Highlighter, but can sometimes not be thick enough for other dyes, especially alcohol based ones; leaving you with stained fingers like you’ve been smoking sixty roll-ups a day for a decade. Reasonable household rubber washing up gloves work best. There are almost as many ways to dye and stain leather as there are dyes and stains; each will provide subtly differing results. Likewise, leather being a natural medium, the same dye can provide a different finish or tone across similar yet separate hides; frustratingly sometimes even across the same hide! It is therefore advisable, when making a matched set of anything, to use leather from the same hide as far as is possible. The method of application can be by brush, sponge, cloth, wool dauber or even a small piece of dense sheepskin. There are advantages and disadvantages to each and much of it comes down to personal preference. Brushes can leave streaks and brush marks, as can daubers. Sponges often deliver an excessive amount of dye, again, as can some daubers, whereas cloths can sometimes not deliver enough leaving a patchy finish. A piece of trimmed sheepskin can be the most consistent, however they can be tricky to obtain; too dense or coarse and streaks can be a problem, too soft and an inconsistent amount of dye will be delivered. There is a knack to their selection and trimming, however they are my preferred medium so unless otherwise stated consider the following advice given as if they were being used. Though the techniques themselves are pretty much the same across the board, I would advise practising on scrap leather to find whichever suits you best.
Common problems:
A streaky or patchy finish. This is most commonly caused by an uneven application of the dye across the surface overall. The bigger the area being dyed the harder it is to maintain an even coat. To combat this it is important to dye each piece in a single session. If a break is taken for long enough to allow the dye to dry it is much harder to blend it with the un-dyed section. Likewise, simply applying additional coats can sometimes simply exacerbate the problem; excessive layers will simply build on each other rather than even out the tone. This can particularly be a problem with Tandy’s Eco-Flo ‘All in One Stain & Finish’ for as it contains a varnishing agent within the dye it will become tacky and streaky if a second coat it applied. With penetrative dyes the best approach is to keep the initial application as even as possible. The first contact will always deliver the most dye to the leather. The further the dye is spread beyond that point the less will be delivered to soak into the leather. However it can often still continue to ‘colour’ the surface of the leather and so patches can be missed until it dries; where more has penetrated it will dry a darker tone. For surface dyes this is less of an issue. However maintaining an even pressure over the entire application is what will help alleviate any streaking. Likewise with antiquing and staining, even pressure is most important, not just when applying the colour, but also when removing the excess.
Penetrative Dyes.
These are dyes that soak through the surface and into the grain of the leather. This can give a better depth of colour and generally be more resistant to scratches and scuffs revealing the natural colour of the leather below. One application is generally enough to provide a good even tone with alcohol or oil based dyes, though with lighter colours and some water based variants a second, more sparing coat, can be helpful. Many of these dyes within a single range (such as Fiebing’s Leather Dye) can be mixed together to provide a wide range of individual colours and shades. The lighter ones can also provide a good base colour for further antiquing or highlighting. Gently apply using a small overlapping circular motion, working from one side to the other. When you feel it running dry, reload your ‘swab’ (be it a sponge/dauber/whatever) and continue where you left off. You shouldn’t need to use much pressure to transfer the dye from the swab to the leather, if you do then it generally means that the swab is drying out and you need to reload. It is better to work little and often rather than over-soak. Once everything is completely dry, you should use a clean cloth to buff over the entire piece to remove any excess surface pigment. Some dyes will shed more than others; oil dyes tend to shed the least.
Surface Dyes.
Not surprisingly, surface dyes barely penetrate the leather to colour it or, in the case of acrylics (like Tandy’s Cova Color), merely adhere to the surface and do not penetrate at all. This can make them more subject to revealing scratches and scuff marks, though this can actually be useful if that’s the overall look you are trying to achieve. A very good example of a surface dye is Tandy’s Eco-Flo ‘All in One Stain & Finish’. Applied in a similar fashion to penetrative dyes however, it is recommended that a greater load is delivered in a single session. You should work it well across the surface of the leather with overlapping stoke, maintaining an even pressure to distribute it over a larger area. Once the full area is evenly covered and any cuts, tooling etc are filled, change to a clean cloth, or piece of soft sheepskin, and buff over the entire piece to remove any excess stain.
Acrylics are effectively paints rather than dyes and are used in exactly the same manner as if you were painting on to paper or canvas. Used neat they are generally opaque, though be aware that if you are using them over an already dyed surface some lighter colours (especially white) will pick up and transfer the dye below. They can be diluted with water to varying degrees, becoming more translucent. Some interesting effects can be gained this way by using them as a wash over other colours. It is advisable to build up thin layers, allowing each to fully dry in between, rather than rely on plastering it on. When applied too thick, particularly over large areas, acrylics can be prone to cracking and flaking; especially if the area in question is designed to be flexible (e.g. across the spine of a book).
Antiques & Highlighter.
Antique and Highlighter are both very similar products that achieve a very similar effect. The difference (apart from the colour range) is simply the viscosity of the product; Antique is thicker. That’s pretty much it. Both can be used as a surface dye and applied directly onto VegTan leather, though being thinner, Highlighter will require more coats to provide any real depth of colour. However the durability of the finish is inferior to penetrative dyes, or even surface dyes such as those mentioned above. Significantly the lightfast quality of these is not particularly good and so will be subject to fading in strong light; worth bearing in mind when storing items, if something has been partially laid across an item you can be left with a distinct shadow with faded colour where exposed. The real benefit to these products is to build up in depressions and surface cuts thereby providing a variable contrast of tones within a piece overall. This makes them particularly suited for use on tooled work, or on pieces which you have specifically damaged the surface of (be it with a mallet, blade, rasp or simply jumped up and down on) to give an aged, battle-damaged look.
Applied in a similar fashion to surface dyes you should work it well across the surface of the leather with overlapping stokes, maintaining an even pressure to distribute it over a larger area. Once the full area is evenly covered and any cuts, tooling etc are filled, leave the item to dry. Important: Do not leave for longer than 10 minutes. Fill a bowl with clean, slightly warm water, wet a sponge or cloth and wring out until it is just damp. Now proceed to remove the excess dye using the damp sponge. Use a similar overlapping, circular action to the initial process of dyeing but only a light pressure is generally required. Keep going until either the sponge is dry, therefore leaving no further mark on the surface of the leather, or else saturated with excess dye; the latter being noticeable as you will be left with streaks of excess dye rather than it being removed. In this case, quickly rinse the sponge clean in the bowl, squeeze out as much water as possible and continue where you left off.
Common Problems:
When using Antique or Highlighter on a single large piece it can be difficult to maintain an even tone without any patching. This is simply because the longer any excess is left on the surface the harder it becomes to remove. Over a large area you will need to rinse clean your sponge or cloth a number of times, all the while the last bit you get to has had extra time to set. Apart from obviously working as smoothly yet as fast as possible, the only other way to help alleviate any patching is by using a large cloth rather than a sponge. Whilst the latter is quicker to rinse and squeeze out, with a cloth you don’t need to do this and can simply shift it about to use a clean section.
Additional Tip:
To increase the durability of the finished colour you can apply a base colour with a penetrative dye and then use a complimentary or even contrasting antique or highlighter over the top. The results can be widely varied depending entirely on the combination of colours and strengths of dye used, so experimentation on scrap leather prior to final dyeing is advised.
Surface Finishing.
There are a wide variety of finishes available, some of which perform the same function so selection can simply be a case of personal preference. Products like Tandy’s Super Shene and Satin Shene will give a reasonable level of water resistance (though not ‘proofing’) and have the added advantage of coming in both a high gloss and satin finish. Likewise Fiebing’s Leather Sheen or Acrylic Resolene provide a similar glossy finish (though Resolene is more mellow) and can be applied in the same ways as the Tandy products. A brush or sponge are both viable methods of applying the above finishes. Brushes can be more useful over small or detailed pieces however are more likely to leave tracks or uneven coverage over a larger area. Sponges can allow easier, more even coverage over larger pieces but care needs to be taken over heavily tooled areas as they can often cause excessive foaming or bubbles. Gentle, overlapping, straight strokes (as opposed to the circular motion for dyeing) will give a reasonably smooth delivery. Wash clean any brushes or sponges immediate after use with water if you would like to be able to use them again.
Common Problems:
Brush marks and streaks can easily be caused by passing the brush or sponge over the finish whilst it is still tacky. Unfortunately there is little that can be done about this other than the obvious of not allowing it to happen in the first place. If it does however, a second coat applied with a little more pressure over the entire item, prior to the first completely drying, can sometimes help even out the coverage. Additionally some stains or surface dyes can be lifted somewhat by these finishes and leave slightly coloured smears. This is more likely to happen where excess dye has built up in deep cuts or heavily tooled areas. Extra care should be taken when dyeing items like this to ensure as much excess is removed as possible. Beyond that, very careful and gentle application of the finish with as little pressure as possible should help to avoid too much pick-up.
Additional Tips:
There are a number of finishes available, such as Fiebing’s Leather Balm, Tan Kote and Carnauba Creme which are not water resistant. These may be used to seal your work and tend to result in a more mellow finish. They also tend to contain ingredients that help keep leather supple, so are particularly useful for more flexible items such as book covers. If a more waterproof finish is required then specialist proofers such as Nikwax can be used. However be warned that not all products work well together, so rather than potentially ruin your work it is best to check their suitability on some scrap which you have dyed the same way as your project. If this isn’t possible then test on a small unobtrusive area of the item itself and give the proofer time to be fully absorbed and then re-test for colour fastness. Additionally some waterproofing products such as Mink Oil, or leather conditioners such as Neatsfoot Oil or Fiebing’s Saddle Oil, whilst they will undoubtedly will protect your leatherwork, are not recommended for use on leather which has been water-hardened (cuir bouilli) or case moulded (cold water moulding). This is because the oils in these products are specifically used as they are deeply penetrative and serve to swell and separate the leather’s fibres (which is why heavily oiled leather is so supple). However, this action is contrary to mechanism by which hardening and moulding works, which is (very basically) to swell the fibres and then contract them more tightly into a new position.
Blocking.
Blocking (sometimes termed ‘resisting’) is a very useful technique that can create beautifully subtle colour effects or help preserve more striking differences. The specific product for this is Tandy’s Eco-Flo ‘Block Out’. Applied neat with a brush and carefully painted over an area then allowed to dry completely. This will then resist any colour bleed when undertaking further highlighting or antiquing.
A similar effect can also be achieved by using Super or Satin Shene, though neither provide quite as an effective resistance as Block Out. You can apply multiple coats instead (usually 2 or 3) or use it to your advantage to create subtle shades of colour.
Wash clean any brushes immediate after use with water.
Edge Dye.
Fiebing’s Edge Dye is formulated to provide a good seal on the vulnerable cut edge of your leather. Whilst you do not have to bevel and burnish the edge first, doing so with provide you with the best possible seal and help prevent excessive wear. Edge Dye is available in regular bottles, or a squeeze bottle with an integral sponge applicator. However, this applicator can become split and worn prior to using all the dye in the bottle. A wool dauber can be used, but it can prove to be wasteful and not be particularly neat when trying to keep the dye just to the leather’s edge. Personally I’ve not found better than a small strip cut from a sponge, folded and gripped by a clothes-peg. As it gets worn, simply discard the sponge and replace as necessarily. To apply simply dip the sponge (or dauber etc) onto the surface of the dye and pick up a small amount onto the sponge. If needed, scrape any excess off against the top of the bottle, then gently draw it along the edge of the leather. Continue reloading and applying all the way round then leave to dry. If required apply a second coat to obtain an even colour. Edge Dye is only available in black and brown, which is generally suitable for most projects, indeed a black edge can provide a nice contrasting finish to a piece dyed a lighter colour overall. However, if you are intending to keep a natural VegTan finish, then there is an alternative: a plain beeswax block. Rub with a fairly firm pressure along the leather’s edge to apply some wax to the leather and then rub vigorously over it with a burnisher. The friction will warm the wax and blend it into the leather providing a seal. This method can also be used if you wish to keep the dyed edge the same colour as the surface of the piece. It is worth bearing in mind though that it will not be quite as durable a seal as that provided by a specialist edge dye.
